CSS Form Builder 2 incorporates a number of older WebAssist extensions to create a complete form building experience. Using CSS Form Builder, you can create complete online forms for sending emails, uploading files, and much more.
This tutorial will guide you through creating a form with CSS Form Builder. This form will include functionality for sending emails, uploading files, validation, and more.
You will need the following items before starting this tutorial:
- Dreamweaver CS3 or later
- CSS Form Builder 2 Installed (click here for installation instructions)
- PHP/MySQL Testing Server (optional)
For more information see Setting up a Testing Server
- Dynamic Site Defined in Dreamweaver
For more information see Defining a dynamic site in Dreamweaver
- MySQL Database Connection configured (optional)
For more information see Creating a MySQL database connection in Dreamweaver
The WebAssist menu
When installing CSS Form Builder 2, a number of entries will be added to a WebAssist option of the Dreamweaver menu. This menu contains all the access points you will need to create your forms, and make custom changes to existing forms. The following section details what can be accomplished from each access point.
- Forms: Contains access to CSS Form Builder and other tools related to form creation.
- File Manipulation: Provides access to tools for creating file upload or download functionality, and for managing files on your server.
- Forms > Progress Bar: Allows you to insert a progress bar to any form.
- Create Email Message: Allows you to apply email functionality to a page.
- Forms > Validations: Allows you to manually apply client side and server side validations to existing forms.
- Forms > HTML Editor: Allows you to insert HTML Editor instances to existing forms.
Most of these tools are utilized for you by the CSS Form Builder interface but can be individually accessed in case you want to apply that functionality to other forms that were not created by CSS Form Builder.
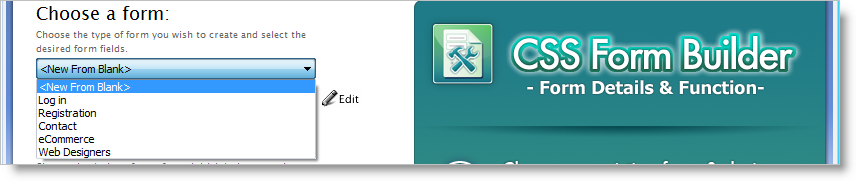
The first step in creating your form is to choose the type of form you intend to create. CSS Form Builder includes a number of presets for you to choose from. It is recommended that you select a preset that closely matches what you are trying to create. You can then modify the preset by adding additional fields, or removing ones you do not require.
Step 1: Choose a form
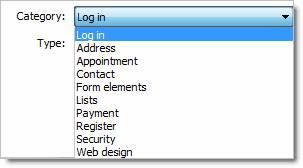
- From the Choose a form menu list, choose a form category that best matches what you are going to create.
- From the next menu list, choose the specific form type that you wish to create.
If you wish to create a new form from scratch, leave <New From Blank> in the first menu list, and proceed with modifying your form.
Step 2: Customizing your form contents
If you wish to add/remove fields that currently exist in the form preset you have selected, you will want to follow these steps for guidance on customizing the contents of your form. This includes adding file fields to your forms for adding file upload behaviors.
- The Edit Form interface of CSS Form Builder allows you to modify each individual form element, configure validation, and rearrange the layout of your form.
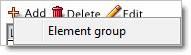
In this interface, the various form elements are organized by groups, where each group contains one or more form elements. Each group is managed within a Fieldset.
- Change the label of a fieldset by selecting the fieldset and modifying the options below.
- Select each group individually to modify the options for each group.
- Choose from the category menu to choose the category you wish to use for the selected group.
Selecting a category is the quickest way to customize which form fields appear on your form without having to manually configure the validation. To save time you might want to create groups that contain the fields you want, and just delete any fields that are not needed.
- Add any additional groups by clicking Add > Element group
The new group will be added directly beneath the currently selected group.
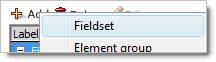
- Add a new fieldset by selecting an existing fieldset and clicking Add > Fieldset.
Step 3: Modify individual form elements and validation
If desired, you can modify each individual form element by following these steps. This is where you have the ability customize the validation error messages, and what type of validation is applied to each element.
- Select the group that contains the elements you wish to modify and choose Edit.
On this page, each group is broken down into lines which are further broken down into sets. A line is an actual line on the page, and a set often consists of multiple form elements that share the same label.
For example, ‘Name’ is commonly in the same set, but contains two text fields (first name and last name).
A set shares the same validation error message. Therefore, if one of the form fields in a set fails, the same error message will display.
- To customize the validation error message, select a set from the tree, and enter your desired message in the window.
Step 4: Changing the form element type
- Select a field from the tree.
- From the options available below, complete the following.
- Label: Enter the label (if any)
- Type: Choose the type of form element you wish to be created.
To protect your form from being completed by web robots, Captcha and Security Question options are provided under the Type menu. These two options do not have validation options.
Step 5: Applying validation
- For the selected form element, configure the following.
- Required: Select if this form field must be completed to pass validation.
- Validation-Type: Choose the type of validation you wish to be applied to this field.
CSS Form Builder automatically creates the necessary validation for the type of validation selected.
- Once you have specified all the settings for that form element, repeat the process with all other form elements within the tree.
- Choose Finish when you have made all your changes.
After choosing Finish, you will be prompted to save a preset. This will allow you to quickly use these same settings to create additional forms in the future.
CSS Form Builder provides a number of preset designs that you can choose from. These designs vary in size and shape and are provided to save you time in finding the best form for your site. Although each individual element of your form can be modified however you like, to save you time in creating the perfect form design, CSS Form Builder 2 has integrated Theme-It. Using Theme-It, you can customize all the colors used in your form as well as any images that may be included.
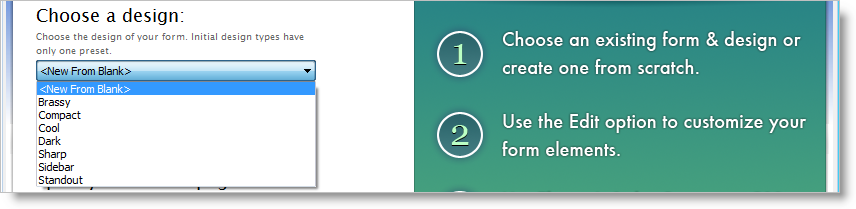
- In the Form Details tab of the main CSS Form Builder UI, select a design from the Choose a design menu.
Reference the preview area to the right to see the form you are creating.
Choose the form design that you like best and you can customize it further to match your site's design. If you want to design your form from scratch, leave <New From Blank> selected.
- To modify the colors and images of your site, select the Theme-It button.
Theme-It provides two tabs for customizing your form design: Colors and Images. Refer to the Theme-It Getting Started Guide for more information.
- To modify the CSS for individual elements of your form, choose the Customize CSS option.
- Choose from the menu list the aspect of your form you wish to customize the design for.
For some options, an additional menu list will appear.
- Each option includes different settings allowing you to completely modify each aspect of a form.
To save time, you may only want to modify the design for the elements that appear on your page. For example, if you are not using Captcha, you may not want to devote the time to customizing its appearance.
- Proceed through each option, modifying the settings to appear as desired.
- Click Apply to update the preview as you make changes.
To test changes to validation messages and date picker designs, you will want to preview your form in a browser by clicking on the Preview.
- When you are finished, click Finish.
- If desired, save a preset so that you can use your same design for other forms you create with CSS Form Builder.
The Action Page is the page that this form will submit to. For most forms, the action page is the same as the page you are inserting the form to, and this is set for you by default.
- Choose the browse option for the Action page field, or manually enter the action page you wish to use.
Forms can be submitted through one of two different methods. By default, POST has been selected as it is the most secure and will work for most types of form. The following describes which method to use:
- POST - Should be used for most forms. This option is most secure since it does not display any values in the URL field after submitting.
- GET - This method will includes the various values entered into the URL field when submitted. This is useful in situations where you might want to allow for bookmarking the resulting page.
The Form Function tab is provided for you so that you can configure any form functions that are going to be applied to your form based on the form elements that you have added to your page. The Form Function tab allows you to configure email settings (if you wish the form to send an email when submitted), file upload settings (if your form contains a file field), and HTML Editor settings (if your form contains an HTML Editor instance).
- From the main Form Builder interface, choose the Form Function tab.
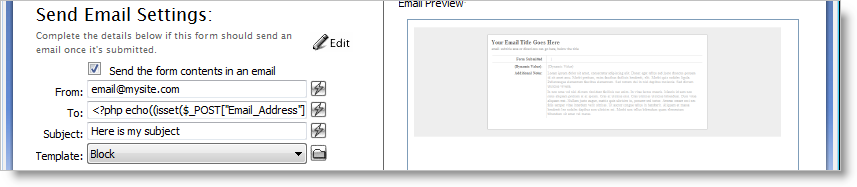
Step 1: Configuring Email Settings
- If you wish an email to be sent when submitting this form, select the Send the form contents in an email checkbox.
- In the From field, enter the email address you wish the email to appear to come from, or choose the lightning bolt to specify the value dynamically.
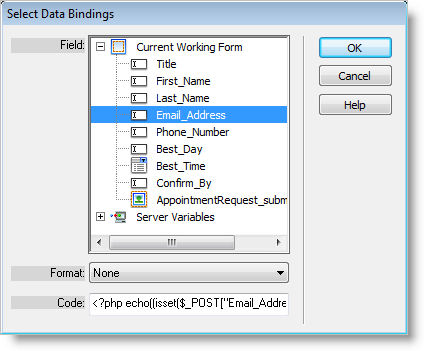
- In the To field, enter the address that the email should be sent to. In most cases, you will want this to be the email address that was entered in the Email Address field of your form. Follow these steps to specify the To address dynamically to a field in your form.
- Choose the To field lightning bolt.
- In the Select Data Bindings window, expand the Current Working Form option to choose an option from your form.
- From the list of available form elements, choose the field that contains the email address you would like to use.
- Once selected, click OK.
- In the Subject field, enter a subject that you want to use for the email that is sent.
- From the Template menu, choose a template for the email the email.
Refer to the preview to see the different email template options.
- For more specific Email Settings configuration, choose the Edit option to launch the Universal Email interface.
This will allow you to configure attachments, set delay options and any of the other features of Universal Email with the form you are creating.
Step 2: Configure File Upload Settings
If your form contains a file field, the Form Upload Settings option will be available on the Form Function tab.
- Select the Save uploaded files checkbox if you wish to save files that are uploaded through a file field on your form.
- Using the browse option or lightning bolt, specify the folder to be used to store the uploaded files.
Step 3: Configuring the HTML Editor settings
If you wish to utilize the HTML Editor Advanced File Manager features, including apply an existing SecurityAssist rule to the file manager, you will need to configure your HTML Editor Settings here.
If your form contains an HTML Editor instance, the HTML Editor Settings will be displayed on the Form Function tab.
- Select the HTML Editor Global Upload Settings Edit option to launch the HTML Editor interface for managing your HTML Editor instance.
For assistance in using this interface, refer to the Form Function page of the CSS Form Builder help system.
Once you have configured all the settings for your form, you can go ahead and click Finish to create the form in Dreamweaver.
When your form is created, CSS Form Builder will create a webassist folder and a SpryAssets folder that contain the files used for your form to function. Make sure to upload these files to your live server when publishing your form.
Testing your form
If you have a PHP Testing Server configured, you can test your forms functionality immediately.
To test the email functionality of your form, you will need to make sure that your testing server is running an email server. In some cases, you may need to customize the Email Settings which you can do by reentering the Universal Email interface by selecting the Universal Email Behavior from the Server Behaviors panel. See the Email Object Settings of the CSS Form Builder 2 help documentation.
All the various features or functions added to your form can easily be further customized or changed by reentering each particular interface. In some cases, further modifications that aren't provided in the CSS Form Builder interface, can be accessed from the particular interface that handles that functionality. The following information shows you how to reenter each interface for modifying various behaviors.
- With your form open in Dreamweaver, click once on the tabbed outline of your Form Builder form.
- From the Properties Inspector, choose from the following depending on what you wish to modify.
- Choose Edit Form to launch this form in the CSS Form Builder primary UI.
- Choose Edit Theme to open the Edit Design Interface.
- Choose Edit Contents to edit the form contents.
- Choose Edit or Remove for the Progress Bar.
The Properties Inspector also includes two additional options for further modification of how your form functions.
- From the Target menu, specify a desired target for the form.
- From the Encoding type menu, specify a desired type.
Additional Reentry points
Other features that have more complex functions can also be modified after your form has been created.
- Updating Email functionality: Open the Dreamweaver Bindings panel from Window > Bindings, and double-click the Universal Email Binding. This will launch Universal Email where you can fully customize the email functionality applied to your form.
- Updating HTML Editor functionality: From Dreamweaver's Design View, select the HTML Editor instance. Choose the Edit option from the Properties Inspector to launch the HTML Editor interface.
- Updating file upload functionality: Open the Dreamweaver Server Behaviors panel from Window > Server Behaviors, and double-click the File Upload behavior.
At this point, you should have a functioning form that you can upload to your website. However, if you wish for your form to insert data into a database, you will need to apply Insert Record Server Behaviors using a different WebAssist extension, DataAssist.
For more information on applying the Insert Record behavior using DataAssist, review the Insert Record page of the DataAssist Help System.