close ad
 
Important WebAssist Announcement
open ad
View Menu

Web development tutorial

Define a dynamic site in CS5+

Tutorial created by Ray Borduin, WebAssist

Categories: Dreamweaver

rating

When using a testing server and creating dynamic PHP pages, you will need to define your Dreamweaver site in order to store your website’s files in the correct location for testing. Although this process can be done at any time, it is recommended to complete it prior to starting a new website.

The following tutorial shows you how to define your dynamic site in Dreamweaver to work best with WebAssist Dreamweaver extensions.

arrow downWhat you need to start:

  1. Dreamweaver CS5
    If you are using Dreamweaver CS4 or lower, follow the Defining a Dynamic Site in Dreamweaver CS4 tutorial.
  2. PHP Testing server configured
    If you have not already set up your testing server, refer to the Setting up a Testing Server tutorial.

arrow downConfigure your testing server

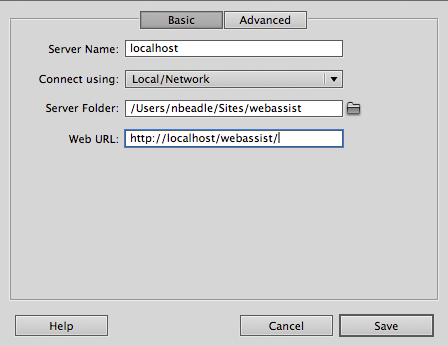
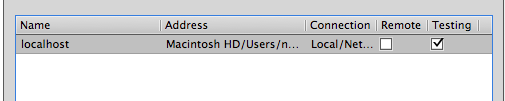
Defining a site in Dreamweaver is best done before you begin creating your website. The Local Info category allows you to specify where you will store your website on your local computer.

  1. In Dreamweaver, choose Site > New Site.
    If you already defined a site, but need to modify it to use your testing server, select Manage Sites. Then, select your site to modify, and click Edit.
  2. From the Site category, enter a name for this site.
  3. Choose the Local Site Folder Browse icon.
  4. Navigate to the folder on your computer where your testing server stores your websites.
    If you installed XAMPP, this will most likely be located at C:\xampp\htdocs.If you installed MAMP, this will likely be OSX:Applications:MAMP:htdocs
  5. Choose the Create New Folder icon to create a new folder within this directory.

  6. Enter a name for this folder that is similar to the Site name you specified.
    This will help you keep track of your websites. As you create multiple websites, you will want each website to be stored in its own sub-folder.
  7. Click Select to confirm this selection.
  8. Choose the Servers category from the side navigation to proceed.
  9. To add your first server, click the Add ( + ) icon.
  10. In the Basic settings, enter a Server Name.
    For example, 'localhost' would be appropriate since this will be your testing server.
  11. From the Connect dropdown, select Local/Network.
  12. Choose the Server Folder browse option and navigate to the location of your testing server where you plan on saving this site's files.
    In most cases, this is the same as the setting you chose for the Local Site Folder (step 4).
  13. In the Web URL field, enter the URL for viewing this site on your testing server.
    This will be something such as http://localhost/'directoryname' where 'directoryname' should be replaced with the sub-directory you created in step 5.

  14. Choose the Advanced option to proceed.
  15. From the Server Model dropdown, choose PHP MySQL.

  16. Click Save to save the settings for this server.
  17. Now that your testing server has been configured, uncheck the checkbox in the Remote column and select the Testing checkbox.

arrow downConfigure your remote server

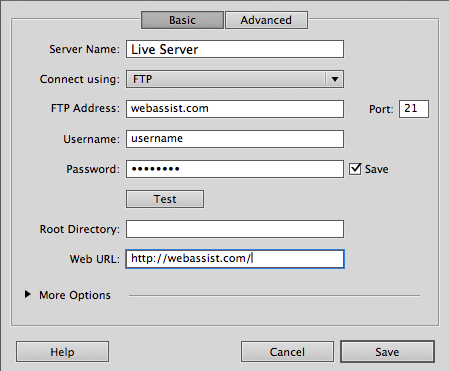
Next, you will configure the Remote (Live) server. When properly configured, you can upload your website's files directly to your live server from within Dreamweaver.

Certain WebAssist products rely on a properly configured Remote Server in order to work properly with your remote database. This is particularly important for users of PowerCMS Builder.


  1. To add your remote server, click the Add ( + ) icon again.
  2. In the Basic settings, enter a Server Name.
    For example, 'remote server' would be appropriate since this will be your remote server.
  3. From the Connect using dropdown, select FTP.
    FTP is the standard method of uploading your site's file to your remote server. If you intend to use a different method, choose that instead.
  4. In the FTP Address field, enter the address for accessing your remote server via FTP.
    If you do not know this, log into your Hosting Provider's Control Panel and check the FTP settings.
  5. In the Username field, enter the FTP username for your remote server.
  6. In the Password field, enter the FTP password for your remote server.
  7. Select the Test option to confirm that your settings are correct.
    If the test is unsuccesful, you should check with your hosting provider to ensure you have the correct FTP credentials and do not need to change any additional settings.
  8. In the Root Directory field, enter the name (or path) for the directory on your remote server where you wish to store this site's files.
  9. In the Web URL field, enter the live URL to your website on your remote server.

  10. Choose the Advanced option to proceed.
  11. From the Server Model dropdown, choose PHP MySQL.
  12. Click Save to save the settings for this server.
  13. Leave the Remote column checkbox selected.

  14. Click Save to save your Dreamweaver site definition.

arrow downWhat to do next...

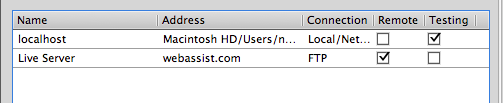
You've now defined your dynamic site in Dreamweaver, and you are ready to start creating your website's dynamic pages. Your first step should be to create a database connection to tell Dreamweaver what kind of pages you intend to create with this site and where your database is stored.

arrow downReviews and comments

Comments will be sent to the author of this tutorial and may not be answered immediately. For general help from WebAssist, please visit technical support.

Sign in to add comments
rating

Build websites with a little help from your friends

Your friends over here at WebAssist! These Dreamweaver extensions will assist you in building unlimited, custom websites.

Build websites from already-built web applications

These out-of-the-box solutions provide you proven, tested applications that can be up and running now.  Build a store, a gallery, or a web-based email solution.

Want your website pre-built and hosted?

Close Windowclose

Rate your experience or provide feedback on this page

Account or customer service questions?
Please user our contact form.

Need technical support?
Please visit support to ask a question

Content

rating

Layout

rating

Ease of use

rating

security code refresh image

We do not respond to comments submitted from this page directly, but we do read and analyze any feedback and will use it to help make your experience better in the future.