close ad
 
Important WebAssist Announcement
open ad
View Menu

Web development tutorial

Display relational table data with plug-ins

Tutorial created by Ray Borduin, WebAssist

Categories: Data Bridge

rating

Are you looking for a method to quickly and easily display the results of relational table content on the same page like you would see in a purchase order history?

In this tutorial, we’ll teach you how to display related tables using a Framework Builder Plug-In.

arrow downWhat you need to start

  1. A dynamic site set up within Dreamweaver
  2. Dreamweaver CS3 or later
  3. Data Bridge installed and activated in Dreamweaver
  4. DataAssist Orders Details Application Preset, which can be downloaded here
    data-bridge-display-relational-tables-preset.zip
  5. Optional: Orders and OrdersDetails made by eCart's Checkout Wizard that contains order data

arrow downImport the new Preset

First, we'll import a Data Assist Application Preset made specifically for this demonstration. This Application Preset, when used within Data Assist's Create Pages Wizard, will create the necessary table structure and results page for your Order Details.

  1. If you haven't already done so, download the DataAssist Orders Details Application Preset.
  2. Access the Preset Manager in Dreamweaver at WebAssist > Preset Manager.
  3. Select Data Bridge - Preset from the product list.
  4. Click Import.
  5. Browse to downloaded .zip file and click OK.


The Orders Details Application Preset is now ready for use within DataAssist's Create Pages Wizard.

arrow downCreate the Orders Pages

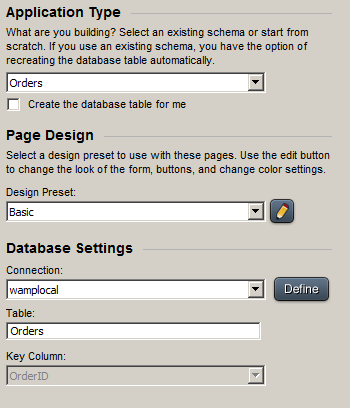
We'll now create the Orders table as well as Search, Results, and Detail pages for your Orders. These pages can be used in an administrative back-end to quickly and easily view customer orders from your online store.

  1. Open any PHP page within your current site and access the Data Assist Create Pages Wizard at WebAssist > Database > Create Pages.
  2. Select the 'Orders' Application Type.
  3. Select the 'Create the database table for me' option if the table does not currently exist in your database.
  4. Select a Design Preset if you would like to use one. Otherwise, you can apply a theme to the resulting pages later using Framework Builder.

  5. Click Finish and create your pages.

arrow downCreate the Details Page

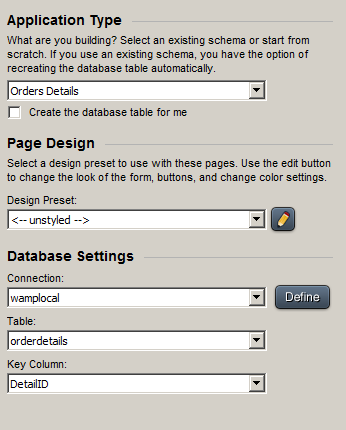
Next, we'll create the Orders Details table as well as a Results page. This page will display the details of the purchase (product name, price, and quantity purchased).

  1. Access the Data Assist Create Pages Wizard at WebAssist > Database > Create pages.
  2. Select the 'Orders Details' Application Type.
  3. Select the 'Create the database table for me' option if the table does not currently exist in your database.
  4. Select a Design Preset if you would like to use one. Otherwise, you can apply a theme to the resulting pages later using Framework Builder.

  5. Click Finish and create your page.
If you are using the DataAssist Create Pages Wizard to create pages for your own relational tables and not the tables in this demonstration, you will need to enable filtering on the results page of your child table (in our example, the Orders Details results page). You can define your filtering under 'Filters and Sorting' when configuring your results page in the Data Assist Create Pages Wizard. In order to display the correct details of any given order, you will need to filter equal to a URL Parameter containing the ID that matches the related ID in your parent table.

arrow downApplying the Plug-In

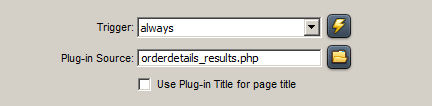
Now that you have pages to display records from both your Orders and Orders Details tables, we will need to 'plug-in' the Orders Details Results into the Orders Details page. This can be achieved using Framework Builder's Insert Plug-In server behavior.

  1. Open your Orders Detail ( orders_detail.php ) page in the Dreamweaver workspace.
  2. Select an insertion point within the page where you would like your Order Details Resultsto display.
    In this case, our plug-in source page contains a form. Because having a form within a form will not work, your insertion point for inserting your plug-in should be immediately after the form on your current page.

  3. Access Framework Builder's Insert Plugin at WebAssist > Framework Builder > Plug-In > Insert Plug-In.
  4. Select the orderdetails_results.php page as your Plug-In Source file and click OK to apply the Plug-In to the page.

    You'll now see your source content displayed within your page in Dreamweaver's Design View.
  5. Save your page!
  6. Now feel free to customize the labels within your pages to reflect the new work flow. Then, perform a search, view the details for an order, and see the purchase details for that particular order!

arrow downWhat to do next...

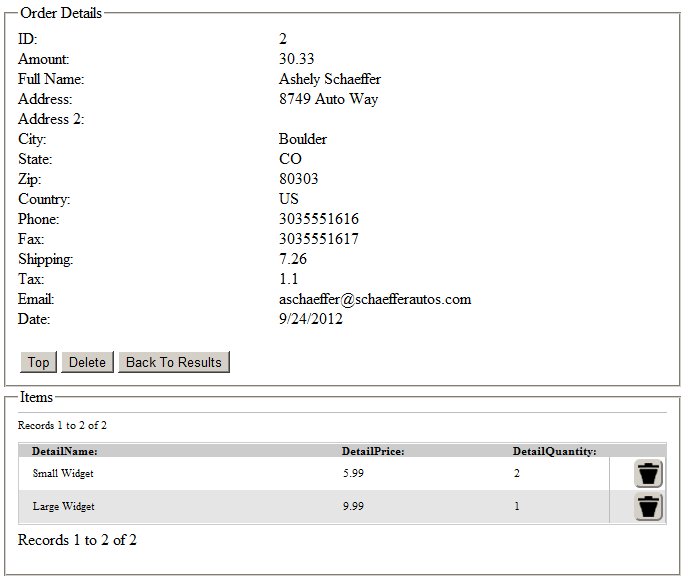
If you completed this tutorial without having existing Orders and Orders Details tables created by eCart's Checkout Wizard, you probably don't have any data to view your final results. You can go ahead and populate the tables with sample data. Just keep in mind that the DetailOrderID column in the OrdersDetails (child) table contains the same value as an OrderID column in the Orders (parent) table.

Other than that, you are now ready to link all kinds of different tables using Data Bridge.

arrow downReviews and comments

Comments will be sent to the author of this tutorial and may not be answered immediately. For general help from WebAssist, please visit technical support.

Sign in to add comments
rating

bblue: 9 Years, 11 Months, 1 Week, 6 Days, 3 Hours, 54 Minutes ago

awesome! except might want to note - i needed to manually add the ProductName to the ordersdetails_results page. the preset did not have it by default. thanks!

Build websites with a little help from your friends

Your friends over here at WebAssist! These Dreamweaver extensions will assist you in building unlimited, custom websites.

Build websites from already-built web applications

These out-of-the-box solutions provide you proven, tested applications that can be up and running now.  Build a store, a gallery, or a web-based email solution.

Want your website pre-built and hosted?

Close Windowclose

Rate your experience or provide feedback on this page

Account or customer service questions?
Please user our contact form.

Need technical support?
Please visit support to ask a question

Content

rating

Layout

rating

Ease of use

rating

security code refresh image

We do not respond to comments submitted from this page directly, but we do read and analyze any feedback and will use it to help make your experience better in the future.