close ad
 
Important WebAssist Announcement
open ad
View Menu

Web development tutorial

Getting Started with Image Resizer

Tutorial created by Ray Borduin, WebAssist

Categories: Data Bridge, CSS, Design, Dreamweaver, PHP

rating

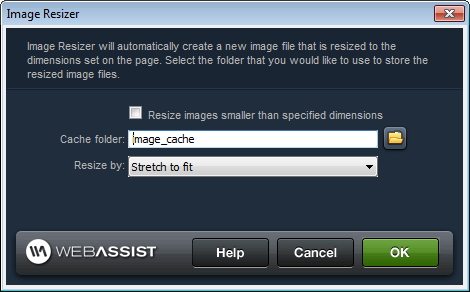
Image Resizer allows you to very quickly and easily resize images that are displayed on your PHP pages. This functionality compares the image file's dimensions to the width and height specified in the HTML of the page, and if different, will create a new image file resized to the correct dimensions specified in the HTML. You can add this functionality to any image on your site, specific content areas that contain multiple images, or areas with placeholder images that will be loaded dynamically.

This tutorial will guide you through applying the Image Resizer functionality to your website.

arrow downRequirements

You will need the following items before starting this tutorial:

  1. Image Resizer
  2. PHP site defined in Dreamweaver
  3. GD Library enabled on host/testing server

arrow downAdding resize functionality

You can add the Image Resizer functionality to your page at any time. Once applied, the functionality runs every time that page loads in a browser, but only actual creates a new image file when necessary.

In most cases, you will probably already have inserted your image, or your image placeholder to your page prior to adding the resize functionality. This tutorial assumes that approach, even though you can also add the functionality first.

  1. Before launching Image Resizer, highlight the area, or section of code on your page that will contain the images you are resizing.
    The Image Resizer functionality will be applied to all images that are inserted within this area.
  2. To launch the Image Resizer interface, go to WebAssist > Image Resizer.
  3. The following settings of the interface allow you to define how the functionality will work.

    1. Resize images smaller than specified dimensions: If enabled, images that are smaller than the dimensions specified in the HTML, will be stretched/upsized to meet the desired width and height. This could lead to images appearing distorted.
    2. Cache folder: This is the directory on your server where your new image files will be stored. If this directory does not exist when the Image Resizer functionality is applied, it will create the folder for you (as long as your server's permission allow for folder creation).
    3. Resize by: Allows you to select the desired method of resizing your image. The following descriptions the differences between each option.

      1. Stretch to fit: Will resize the image to fit the width and height specified. This will not maintain the original image's aspect ratio and may lead to images being distorted.
      2. Fit to Box: Will resize the image so that it fits within the dimensions specified while maintaining the images aspect ratio.
        Depending on whether the original image is tall or wide, the image will be resized to be no taller or wider than the box. Any empty space will be filled with the fill color specified unless the original image is a PNG or GIF that contains transparency.
      3. Crop from Center: Will crop the image from the center to fit the specified dimensions.
      4. Proportion to box: Resizes the image to fit within the box dimensions specified in the HTML without adding a fill color to fill any empty space.


  4. Once you have specified your desired settings for this functionality, click OK.


Now that the Image Resizer functionality has been applied to your page, you can define the desired width and height for the image in the Dreamweaver Properties inspector.
This can be done before or after applying the functionality to your page. You can even change the width and height at any time to modify the functionality.

You can continue to apply Image Resizer functionality to any location you require resized images.

arrow downResizing the Images

With the Image Resizer functionality applied, your images will be resized when the page loads in your browser. The functionality will only be run if the image file that currently exists does not meet the width and height specified. If the functionality has already created the new image file, it will not run again since that new file now exists.

  1. After uploading your pages to your live server, browse to the page that displays your images in your preferred web browser.
    The page will load, checking to see if it needs to resize any images. If necessary, it will resize the images and store the new images on your server in the Cache folder you specified.
  2. The page will load with all the images resized as specified.
  3. Any subsequent visits to this page will be much faster since the Image Resizer functionality will not need to be run again.
    In situations where the Image Resizer functionality has been applied to dynamic images that will change regularly, the functionality will need to run more often. This should never cause a significant delay in page loading.

arrow downUpdating the functionality

You can update the Image Resizer functionality at any time.

  1. From the Server Behaviors panel (Window > Server Behaviors), double-click the Image Resizer option you wish to modify.
  2. When the interface loads, make your desired changes and click OK.
  3. Upload the updated page to your live server and browse to the page to initiate the resize functionality.


You can also remove the Image Resizer.

  1. From the Server Behaviors panel (Window > Server Behaviors), select the Image Resizer option you wish to remove.
  2. Select the Remove (-) icon in the top of the panel to remove this behavior.

arrow downReviews and comments

Comments will be sent to the author of this tutorial and may not be answered immediately. For general help from WebAssist, please visit technical support.

Sign in to add comments
rating

Build websites with a little help from your friends

Your friends over here at WebAssist! These Dreamweaver extensions will assist you in building unlimited, custom websites.

Build websites from already-built web applications

These out-of-the-box solutions provide you proven, tested applications that can be up and running now.  Build a store, a gallery, or a web-based email solution.

Want your website pre-built and hosted?

Close Windowclose

Rate your experience or provide feedback on this page

Account or customer service questions?
Please user our contact form.

Need technical support?
Please visit support to ask a question

Content

rating

Layout

rating

Ease of use

rating

security code refresh image

We do not respond to comments submitted from this page directly, but we do read and analyze any feedback and will use it to help make your experience better in the future.