SecurityAssist allows you to handle the security, user registration and page access needs for your website. This guide will show you how you can use SecurityAssist to create a user registration system and apply invaluable page access rules to your PHP website.
You will need the following items before starting:
- Dreamweaver CS4 or higher
- SecurityAssist 2 or higher
- Already created PHP website defined in Dreamweaver
- MySQL database connection.
The Quick Insert interface of SecurityAssist allows you to very easily build all the user registration pages for your PHP website. This utility will build your pages, create your database tables and allow you to configure form fields and validation needs.
The following section guides you through using this interface for the first time.
- From the WebAssist menu, choose SecurityAssist > Create Security Pages.
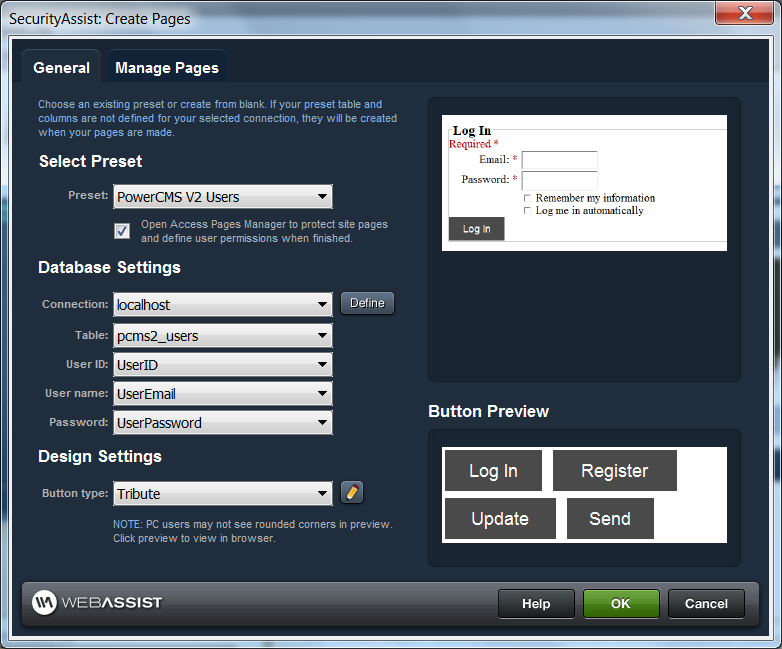
The General Tab
The General tab allows you to set up the database and button settings for the system you wish to build.
- Choose a database preset that you would like to use for your system.
You can choose a provided preset in order to have SecurityAssist add the necessary database tables for you. Presets have been created for you based on WebAssist pre-built solutions that utilize a user registration system.
If you already have a database table for your users, you can choose <New from Blank> to utilize your own database table.
- Configure your database connection details
If your database connection was already configured prior to launching SecurityAssist, the fields will be populated with the appropriate information. Otherwise, select Define to configure your database connection details.
- Configure your button design settings
SecurityAssist applies minimal styling to your form allowing your website's CSS to apply to many of the elements. However, within SecurityAssist, you have the ability to choose a number of button styles and to create your own button design.
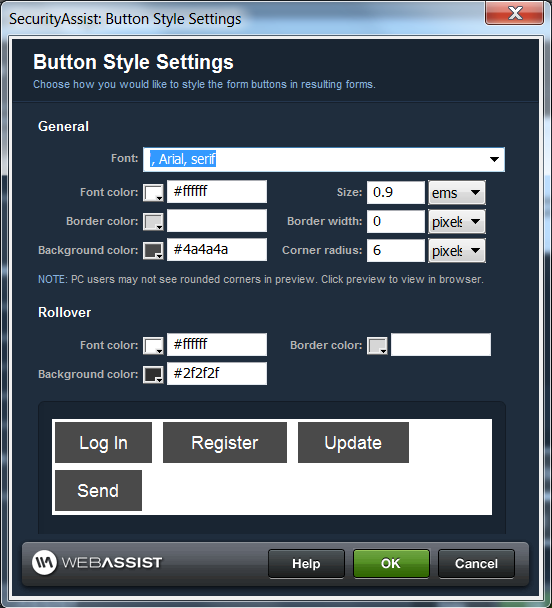
Button Style Settings
- To design the buttons to suit your website's theme, select the Edit icon next to the Button type dropdown.
The Button Style Settings interface launches allowing you to configure the CSS details for all the buttons that are created by SecurityAssist.
- Design your buttons and click OK when finished.
You will be prompted to save a preset for your new button design. This will allow you to reuse this button style when using SecurityAssist in the future.
- Once you have completed configuring settings on the General tab, select the Manage Pages tab to customize the pages that are created.
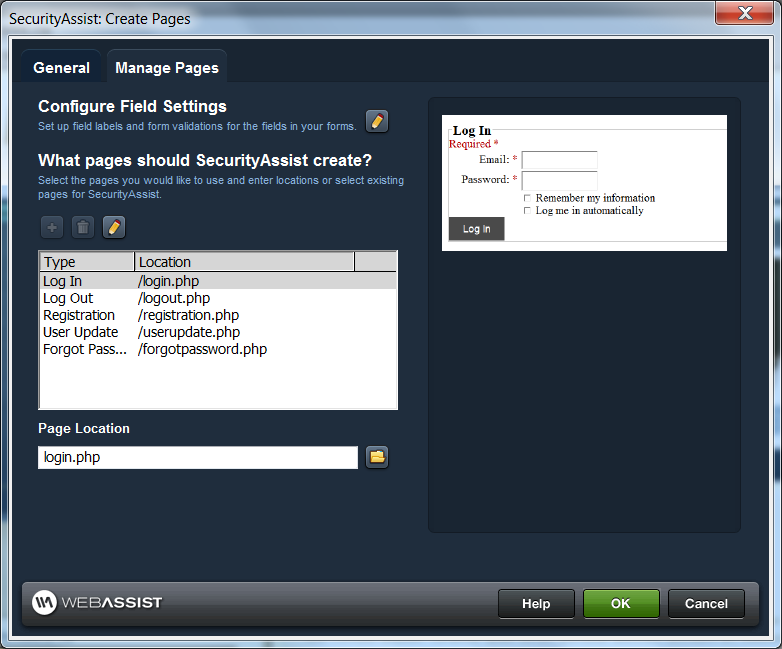
The Manage Pages tab
The Manage Pages tab is provided for you to configure each of the pages that SecurityAssist will create for your system. Depending on the type of system you require or intend to create, you may wish to remove some of the default pages. For a typical user registration system, you will require a Log In, Log Out, Registration, User Update and Forgot Password pages. SecurtiyAssist creates all these pages for you by default.
- Under 'What pages should SecurityAssist create?', you can delete and edit the pages that are going to be created by SecurityAssist.
Some pages cannot be deleted as they are required for user registration.
- You can specify the file name and location by selecting the page from the tree control and entering the filename (and path to the file) in the Page Location field.
You can choose a page that already exists. However, the form content that is inserted by SecurityAssist will be inserted below any other content on that page. If the page was created by SecurityAssist previously, it will not overwrite the content.
Page Settings
Some of the pages that are being created have settings that can be modified. Pages that contain form fields (log in, user registration, user update), can be modified to include additional form fields, or for you to delete certain fields.
- From the tree control, select the page you wish to modify settings for a select the Edit icon above the tree control.
The Edit icon is disabled for pages that do not have configurable settings.
Configuring validation and encryption
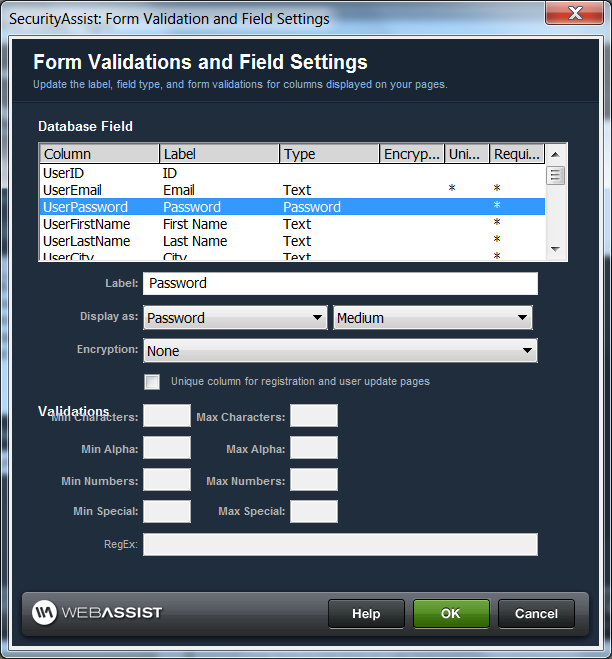
SecurityAssist 2 allows you to configure validation and encryption settings for the form fields that are created and the data that is entered into this fields. Validation is important as it allows you to make sure your users enter data into the fields appropriately. Encryption is invaluable to protect your customer's information, by encrypting data when it is entered into your database.
- Select the Edit icon next to Configure Field Settings in order to configure the settings for each field.
This page lists all the fields that are going to be created with your pages. You can customize the label for each field, specify how you wish for the field to be displayed on your page and specify the desired encryption. SecurityAssist defaults to recommended settings that would work for most user registration systems. In most cases, these settings do not need to be modified unless you require something specific.
- For any field you wish to modify, select the field from the tree control, and modify the settings below.
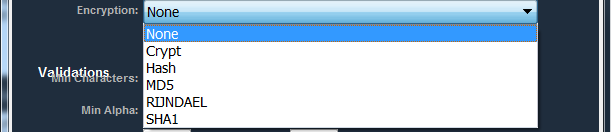
- For any field you wish to encrypt when inserting to your database, select that field and choose the appropriate encryption.
SecurityAssist chooses the appropriate encryption method for your password fields in order to be utilize the Forgot Password feature. See the Forgot Password section (below) for more details.
SecurityAssist supports a number of different encryption types. There are two types of encryption, encryption that can be decrypted and encryption that cannot be decrypted. Certain data should be encrypted in a way that cannot be decrypted, such as passwords. However, data such as user name and address, would most likely want to be displayed on the website in certain locations and for this reason, you would want to choose an encryption method that can be decrypted.
- In the Validation options below, configure the validation you want to be applied to the selected form field.
Validation will make sure that your users enter appropriate data in the field. If the data entered is incorrect, an error message will appear to inform them of the issue that needs to be corrected.
- Once you have configured all the form elements as desired, click OK to return to the Manage Pages tab.
- When you are ready to create your SecurityAssist pages, click OK.
After clicking OK, SecurityAssist will create all your pages and add them to your Dreamweaver site.
SecurityAssist 2 automatically creates a Forgot Password Utility for your users to change their passwords if they have forgotten them. This feature is included with the default setup when creating your pages using the Quick Insert interface.
This utility is built when the password encryption being used cannot be decrypted. In this case, the forgot password page allows the user to enter their email address which then sends an email containing a link that will allow the user to change their password. If the password field uses encryption that can be decrypted, the password is sent to the user in an email. This method is not recommended.
The Forgot Password Utility can be added to any PHP website by using the following features of the Forgot Password Utility:
- WebAssist > SecurityAssist > Email Password > Email Password
- WebAssist > SecurityAssist > Email Password > Email Encrypted Password
With SecurityAssist’s Access Pages Manager you can specify various settings that determine which users can access which pages.
With this menu, combined with the Access Rules Manager and Access Groups Manager, your site will be completely secured.
- From the WebAssist menu, choose SecurityAssist > Manage Site Access > Access Pages Manager.
- Once the Access Pages Manager loads, you will see a site tree of all the files in your site. Here you can restrict or allow access to any of your site visitors, depending on their user level.
- Select the pages you wish to give access to visitors, once they log in. Use Ctrl/Cmd + Shift to select multiple pages at once.
- From the Grant access if: menu choose Logged in to Visitors.
This provides access to the selected pages to anyone who has logged in to the site.
- From the If access denied, go to field enter the file name for the page that you would like non-visitors to be redirected to when attempting to access the selected pages.
- If you wish to restrict access to pages when a user is logged in, you can choose the Not logged in to visitors option.
- You can create a wealth of complex security settings that restrict users based on their user levels. Including, creating administrative permissions, and creating groups of users.
Once you have created your search and results pages, you will want to do some work to style the search form and the results to match your website's design. If you chose to Include CSS when creating your pages, there will be a CSS style sheet within your site for you to modify the styles of your search and results. You may want to add additional styles or place elements in different divs to achieve a different layout than the one provided.


henrik441511: 12 Years, 7 Months, 3 Weeks, 3 Days, 3 Hours, 9 Minutes ago
What about the group manager?
Team WebAssist: 12 Years, 7 Months, 3 Weeks, 2 Days, 7 Hours, 43 Minutes ago
That would be a great tutorial. Thank you for the suggestion!
Rokon: 5 Years, 10 Months, 2 Weeks, 1 Day, 22 Hours, 39 Minutes ago
I would like to request webassist to make good and complete tutorials and not partial type and the tutorial should build base on a novices point of view and not from an expert view as I noticed that there are huge lack of proper tutorials and videos and for this reason questions and answers tables are getting fat day by day.
I tried interAkt extensions and then DMXZone and then now webassits. The interAKT was the best in all the way, the DMXZone is too much complicated, very poor customer support and also lack of tutorials. But I think webassist can be the number one in all respect if they can create proper tutorial and update the systems base on modern frameworks as they have very good customer support and tools also good enough to perform most of the task.
I hope webassist should think this matter seriously. Thanking you.