
Super Suite
Get all extensions for one suite price
Design Extender
Design and create unlimited websites
Data Bridge
Develop database-driven websites
eCart
Build a responsive shopping cart + checkout
MySQLi Server Behaviors
Generate streamlined MySQLi
Free PayPal Toolkit
Paypal, PayPal Credit, and Skype
Help

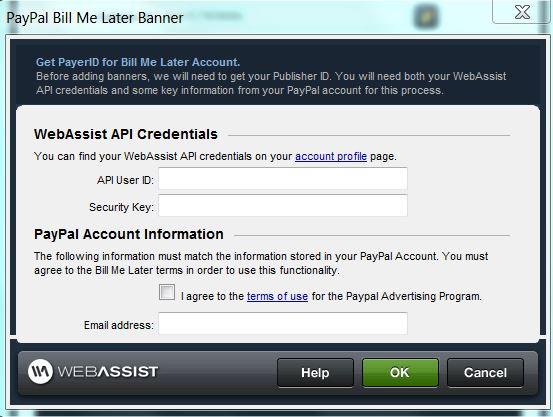
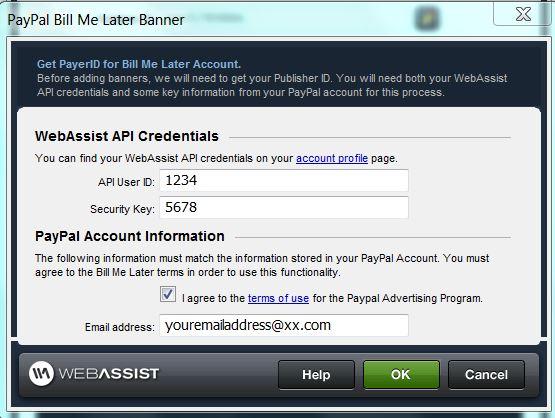
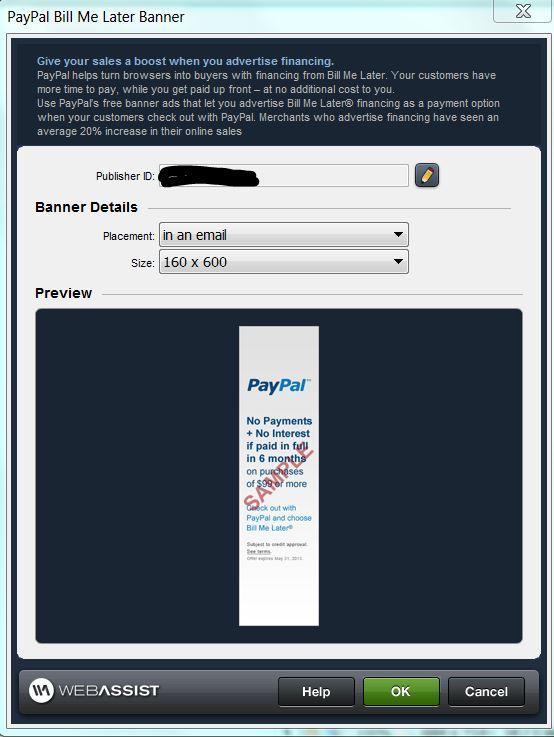
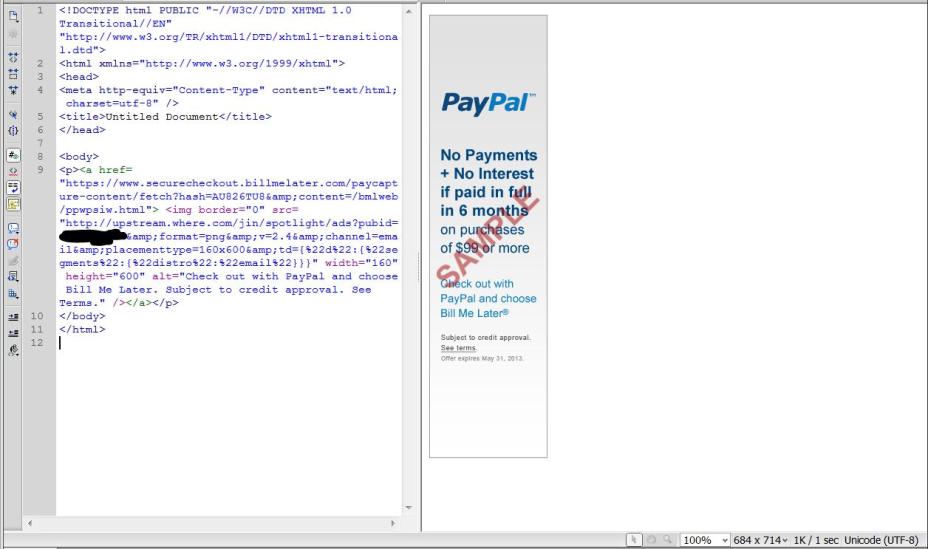
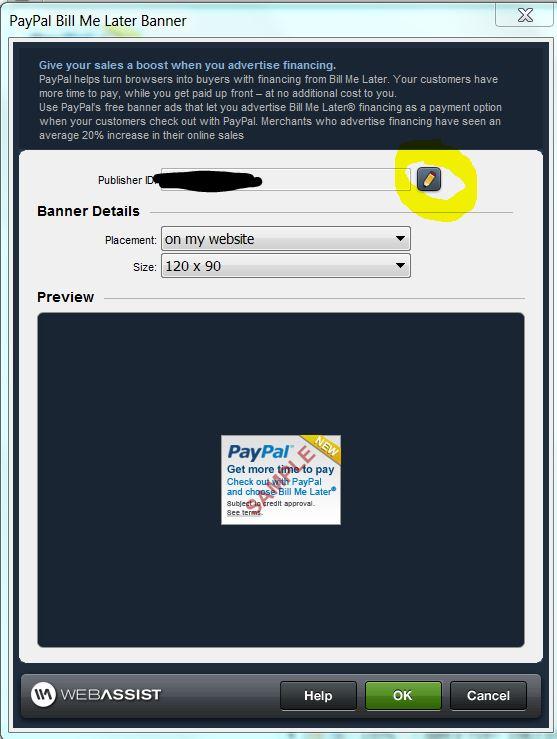
In this tutorial, you will learn how to easily add PayPal's ready-made Bill Me Later banners to your website or email using WebAssist's Free Tools. This tells your visitors that you offer the Bill Me Later customer financing service while they shop.
A service from PayPal, Bill Me Later provides your customers with access to financing. You can use their free, ready-made banner ads on your website or in your email campaigns to tell your customers that financing is available while they shop.
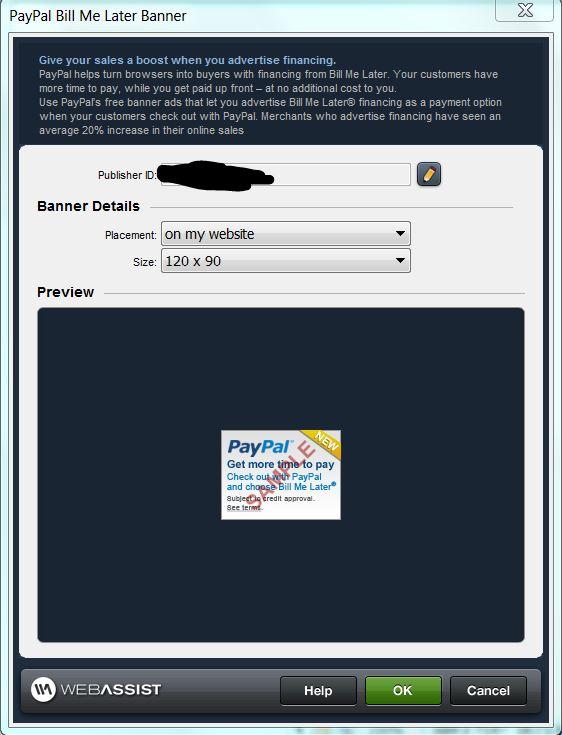
Why would you want to use Bill Me Later? For starters, there is no extra charge to you and you get paid the full amount. It also eases the tasks of billing, determining credit risk, and meeting regulatory requirements. Your customers will also like Bill Me Later because it make purchasing your products more affordable. Not only that, they can easily sign up during checkout and get a determination within seconds. Go here to learn more about Bill Me Later.
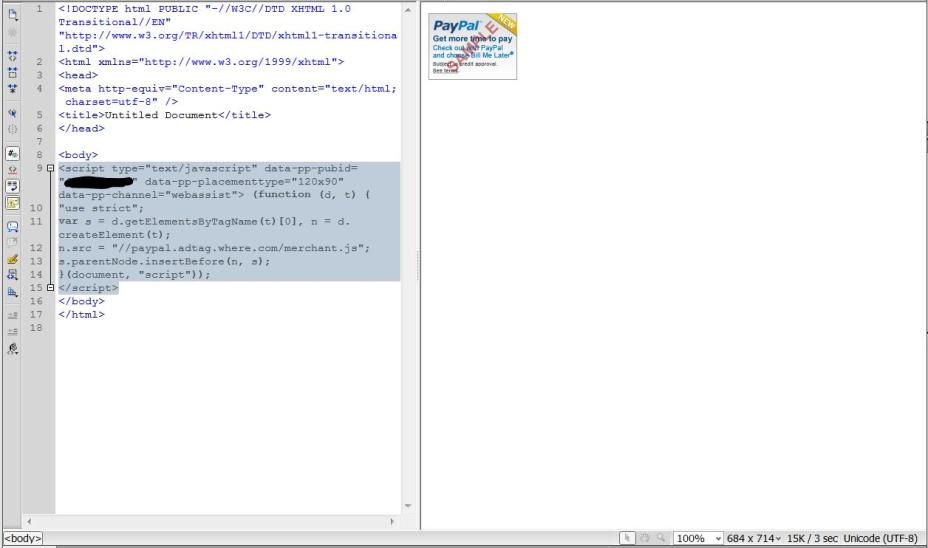
Let's get started with adding the Bill Me Later banner.


If you use PayPal Standard Buttons, you can include a Bill Me Later checkout button with your Buy Now or Donation buttons. See this tutorial for getting started with PayPal Standard Buttons.
If you already have a Buy Now or Donation button, you can use this tutorial to update your button to also include a Bill Me Later button.
Visit the Free Tools support page for more Free Tools tutorials and documentation.
Comments will be sent to the author of this tutorial and may not be answered immediately. For general help from WebAssist, please visit technical support.
Sign in to add commentsYour friends over here at WebAssist! These Dreamweaver extensions will assist you in building unlimited, custom websites.
These out-of-the-box solutions provide you proven, tested applications that can be up and running now. Build a store, a gallery, or a web-based email solution.
©1999-2026 WebAssist.com Corporation. All rights reserved and all that jazz.

Account or customer service questions?
Please user our contact form.
Need technical support?
Please visit support to ask a question
: 1 Year, 10 Months, 2 Weeks, 6 Hours, 57 Minutes ago
HIRE A CERTIFIED CRYPTO RECOVERY EXPERT / ULTIMATE HACKER JERRY
I was duped by a blockchain company that I thought was legitimate around a week ago. I lost more than $25,000 worth of bitcoin when I fell for the fraud. I had to get in touch with the local security guards, but they were powerless to help. I was then told to start the healing process using ULTIMATE HACKER JERRY. Not until my money was successfully retrieved did I initially have my doubts. Although I wouldn't be able to testify, I believe He should be thanked for his efforts. ULTIMATE HACKER JERRY is a reliable source for any hacking or recovery needs. The right person is here.
Their Webpage; ultimatehackarjerry. co m
Mail; contact@ultimatehackarjerry .c om
Text or Call ; + 1 (458) 308 (08 25
: 1 Year, 5 Months, 2 Weeks, 5 Days, 4 Hours, 58 Minutes ago
Lost Your Bitcoin? Contact iBolt Cyber Hacker For Recovery
If you've lost access to your Bitcoin or fallen victim to a crypto scam, I wholeheartedly recommend reaching out to iBolt Cyber Hacker for recovery assistance. Cryptocurrency recovery is a complex and delicate process, and iBolt Cyber Hacker stands out as a trustworthy and effective solution for these challenges.One of the most reassuring aspects of working with iBolt Cyber Hacker is their commitment to transparency. They clearly explain the recovery process, ensure that proof of ownership is verified, and adhere to strict ethical standards. This sets them apart in an industry often riddled with scams.
+39, 351..105, 3619
Support @ibolt cybarhack. com
http s:// ibolt cybarhack. com
: 1 Year, 4 Months, 3 Weeks, 22 Hours, 55 Minutes ago
Living in Los Angeles, I never imagined I’d face such a difficult chapter in my life. At the time, my wife was pregnant, and we were both excited about starting a family. The joy of anticipating a new life should have been the focus, but instead, I found myself trapped in a financial nightmare. I had gotten involved in trading, thinking I was making smart decisions, but it quickly spiraled out of control. To make matters worse, I fell victim to a series of scams, losing over $70,000 in total. Just when I thought things couldn’t get worse, I received a call from someone who promised to help me recover my losses. Desperate to fix the situation, I went along with it, hoping for a breakthrough. But it turned out to be another scam. This left me feeling completely defeated. I was struggling with the weight of my financial ruin, trying to stay positive for my wife and the baby on the way. But the stress was overwhelming, and I felt like I was sinking into a hole with no way out. That's when I discovered Asset Rescue Specialist . Their team quickly took control of the situation, and it was a relief to finally work with people who knew what they were doing. They reassured me, explained how they would help, and guided me step by step through the process. I had been lost and confused, but Asset Rescue Specialist provided the clear path forward that I desperately needed. What impressed me most about Asset Rescue Specialist ,was their professionalism and dedication. They didn’t just promise results they delivered. They took the time to walk me through each stage of the process, answering all of my questions and addressing every concern. Their expertise gave me a renewed sense of hope, and I started to see progress in recovering my funds. They handled everything with care and efficiency, allowing me to focus on my growing family without the constant weight of financial stress hanging over me.Thanks to Asset Rescue Specialist, I can finally breathe a little easier. They gave me the peace of mind I had been searching for and turned a hopeless situation into something manageable. With their help, I’m now able to look forward to the future, especially with a baby on the way. I am beyond grateful for their support and guidance throughout this challenging time. If you ever find yourself in a similar situation, I can’t recommend Asset Rescue Specialist enough. They truly know how to make things right.DM via: Contact Email; assetrescuespecialist@qualityservice.com. or support@assetrescuespecialist.com. WhatsApp,+ 1 9 0 3 5 5 9 1 7 3 3.
: 1 Year, 4 Months, 6 Days, 8 Hours, 12 Minutes ago
LOST MONEY TO FAKE BROKERS? CONTACT→(FOLKWIN EXPERT RECOVERY) FOR ASSIST.
I'm a fairly tech-savvy guy: I check links for doubles, verify sources, and I never download anything shady. But when a fake wallet update stole $220,000 from me, well-let me tell you-if it happens to you, you'll realize how easy this is to fall for. It all began with my regular check of my Bitcoin wallet: a notification popped up, requesting me to install an "important security update." It was absolutely legitimate in appearance-same branding, same language, even the same interface. Wanting to stay ahead with security, I clicked install without a second thought. The very moment the update finished, my wallet locked me out. I tried my usual credentials—nothing. Reset password? The link wouldn't send. My heart pounded as, on another device, I refreshed my balance: zero. Panic set in. My mind raced, wondering: Did I just lose everything? My $220,000-years of careful investments-gone because of one click? I felt sick. I tried reaching out to the wallet's official support, but they confirmed my worst fear: I had installed malware that stole my keys. They couldn't do anything. In desperation, I went to r/Crypto Advice on Reddit. The post was raw, frantic, practically begging for help. Amidst the tsunami of condolences and warnings from folks saying my funds were definitely gone, one reply stood out: "Try FOLKWIN EXPERT RECOVERY. They've helped people in your situation before." Skeptical but desperate, I called, and they called back instantly-reassuring. No impossible promises were made, but they said they would do everything in their power. In hours, they traced where my funds had been rerouted; they were not lost yet. The waiting was torture, but the updates they were giving me kept me sane. Then came that email: "We've recovered your funds." I couldn't believe it. The feeling of logging into my wallet and having the full balance was just unreal. My financial future had been hanging by a thread, and FOLKWIN EXPERT RECOVERY pulled me back from the edge. Beyond just recovery, they took the time to walk me through security best practices, teaching me how to identify fake updates and secure my investments against future attacks. Lesson learned: even the best investors get duped. But thanks to FOLKWIN EXPERT RECOVERY, this wasn't a wipeout.
INFO TO CONTACT: Whatsapp: +1 (740)705-0711 Website: WWW.FOLKWINEXPERTRECOVERY.COM, Email: FOLKWINEXPERTRECOVERY@TECH-CENTER (.) CO M
Warm greetings,
Dr Matthew Connell.
: 1 Year, 3 Months, 2 Weeks, 4 Days, 42 Minutes ago
When I first came up with the idea for my groundbreaking new gadget, I was filled with excitement. I knew it had the potential to change the market, but as a financially strapped inventor, securing a patent seemed like a daunting task. After researching my options, I found "Innovate Legal," a firm that promised quick and guaranteed patent protection for a $3,000.fee, Their pitch seemed solid, and they assured me that for the price, my invention would be in safe hands. I handed over the money with high hopes, confident that I was taking the right steps toward securing my invention's future. Weeks turned into months, but I never received any updates. When I checked in, their responses were slow and vague, yet they assured me everything was progressing. As the delays continued, my anxiety grew, and I decided to investigate further. That’s when I reached out to ASSET RESCUE SPECIALIST for assistance. ASSET RESCUE SPECIALIST quickly uncovered the truth: Innovate Legal had never filed the paperwork for my patent application. I was shocked and devastated. I had put my trust and all of my savings into their hands, only to realize I had been scammed. But ASSET RESCUE SPECIALIST didn’t leave me hanging. They walked me through the process of filing a chargeback with my credit card company. After submitting the necessary documentation, I was able to recover the entire $3,000.I had paid, While the chargeback was a huge financial relief, the emotional toll of this experience was overwhelming. I had almost given up on my invention. However, thanks to ASSET RESCUE SPECIALIST support, I didn’t just get my money back; I regained my confidence and determination. Armed with a clearer understanding of how to protect my work, I decided to handle the patent process myself, ensuring everything was done properly and legitimately this time Today, my invention is officially patent-pending, and while the journey has been challenging, I’ve learned invaluable lessons about trust and persistence. I’m incredibly grateful to ASSET RESCUE SPECIALIST for helping me not only recover my funds but also guiding me back on track with my invention.
FOR MORE DETAILS:
Company: ASSET RESCUE SPECIALIST
mail: assetrescuespecialist@qualityservice.com or
support@assetrescuespecialist.com.
WhatsApp:+ 1 9 0 3 5 5 9 1 7 3 3.
: 1 Year, 3 Months, 1 Week, 2 Days, 10 Hours, 13 Minutes ago
I will never forget the harsh lesson I learned about the perils of investment scams. What began as a promising chance to boost my income through cryptocurrency quickly spiraled into a nightmare. I fell victim to a sophisticated scam and lost $78,000 in bitcoins. The days that followed were consumed by regret, anger, and an overwhelming sense of helplessness,I couldn’t believe I had let my guard down and entrusted my hard-earned money to strangers. Then, while browsing online, a pop-up ad caught my attention. It was for Morphohack Cyber Service, a team specializing in recovering lost cryptocurrencies. Initially, I was skeptical, wondering if it was just another scam. Yet, something about their promise of swift recovery resonated with me, and I took a leap of faith by reaching out to them. Their response was immediate, and within 48 hours, they accomplished the unthinkable: they recovered every last bit of my lost bitcoins. I was utterly stunned, relieved, and deeply grateful. Their expertise and efficiency are unmatched, and I wholeheartedly recommend their services to anyone who has fallen victim to cryptocurrency scams. They are the real deal,here’s their contact information:
Info@morphohackcyber . com
Morphohack@cyberservices . com
Morphohackcyber . com
: 1 Year, 3 Months, 1 Week, 2 Days, 10 Hours, 2 Minutes ago
I will never forget the harsh lesson I learned about the perils of investment scams. What began as a promising chance to boost my income through cryptocurrency quickly spiraled into a nightmare. I fell victim to a sophisticated scam and lost $78,000 in bitcoins. The days that followed were consumed by regret, anger, and an overwhelming sense of helplessness,I couldn’t believe I had let my guard down and entrusted my hard-earned money to strangers. Then, while browsing online, a pop-up ad caught my attention. It was for Morphohack Cyber Service, a team specializing in recovering lost cryptocurrencies. Initially, I was skeptical, wondering if it was just another scam. Yet, something about their promise of swift recovery resonated with me, and I took a leap of faith by reaching out to them. Their response was immediate, and within 48 hours, they accomplished the unthinkable: they recovered every last bit of my lost bitcoins. I was utterly stunned, relieved, and deeply grateful. Their expertise and efficiency are unmatched, and I wholeheartedly recommend their services to anyone who has fallen victim to cryptocurrency scams. They are the real deal,here’s their contact information:
Info@morphohackcyber . com
Morphohack@cyberservices . com
Morphohackcyber . com
: 1 Year, 2 Months, 1 Week, 2 Days, 22 Hours, 8 Minutes ago
Dear Brunoe Quick H a c k Best Rec0ver,
I want to sincerely thank you for your outstanding support in helping me recover my stolen funds. As a surgeon and a single mother of three, losing my savings to a trading scam was devastating.
Your team's skill, dedication, and hard work made all the difference. I’m truly impressed by how you tracked down the scammers and retrieved my money. Your professionalism reflects the strong values of your company. I highly recommend your services to anyone who has been scammed — you truly can help people regain their financial security. Thank you once again for everything you have done.
Sincerely, Brunoe Quick H a c k is here to help …contact information: Brunoequickhack(@)GMAIL .(COM)
Whats-App: +1705-7842-635
Web-Site: BrunoeQuickHack (.)COM
: 1 Year, 2 Months, 6 Days, 19 Hours, 18 Minutes ago
HOW TO HIRE PROFESSIONAL HACKER TO RETRIEVE BACK LOST CRYPTO WITH (META TECH RECOVERY PRO)
Ask META TECH RECOVERY PRO for help via:
Metatech @ Writeme . Com
contact@metatech-recoverypro.com
WHATSAPP +1 (469) 692‑8049
My elation knew no bounds as my earnings began to surge higher. Intrigued, I increased my investment. This investment firm assured me that I could retrieve my profits after two months. Upon the expiration of those eight weeks, I attempted to access my invested capital, only to discover I was locked out of my account. My cryptocurrency investment had been compromised, and I was then instructed to remit a substantial sum to regain full access to my investment. I was utterly bewildered, as the amount demanded was exorbitant. I implored them to deduct the necessary sum, but my pleas fell on deaf ears. I then sought alternative methods to recover my hijacked crypto assets as time was going by, and my business capital, which I tampered with, was crumbling. I engaged with several crypto recovery specialists, but they all absconded with my funds, leaving me deep in debt. I cannot precisely recall how I encountered META TECH RECOVERY PRO, though I believe it was through Facebook. I contacted them, outlining my situation, and they assured me of a successful recovery, along with a forensic analysis of the data I provided. I harbored some skepticism during my interactions with META TECH RECOVERY PRO, yet they ultimately upheld their commitments. I successfully recovered my hijacked crypto assets, which were returned to my digital wallet. Kudos to the team of META TECH RECOVERY PRO, I really applaud their expertise.
Thank you.
: 1 Year, 1 Month, 4 Weeks, 12 Hours, 9 Minutes ago
I would like to express my profound appreciation to Wizard Larry Recovery Expert for their exceptional competence; they are truly heroes, and I wish I had met them quicker before contacting other hackers for assistance. I am posting this comment for those impacted by cryptocurrency investment, mining, and trading scams, and if you read it, you may be able to retrieve your hacked or blocked cryptocurrency investment.
Email:
Wizardlarry (@) mail . (com)
Website:
larrywizard43.wixsite.com/wizardlarry
WhatsApp:
+447 (311) 146 749 and +1(616) 292-4789
: 1 Year, 1 Month, 4 Weeks, 12 Hours, 8 Minutes ago
I would like to express my profound appreciation to Wizard Larry Recovery Expert for their exceptional competence; they are truly heroes, and I wish I had met them quicker before contacting other hackers for assistance. I am posting this comment for those impacted by cryptocurrency investment, mining, and trading scams, and if you read it, you may be able to retrieve your hacked or blocked cryptocurrency investment.
Email:
Wizardlarry (@) mail . (com)
Website:
larrywizard43.wixsite.com/wizardlarry
WhatsApp:
+447 (311) 146 749 and +1(616) 292-4789
: 10 Months, 1 Week, 1 Day, 2 Hours, 9 Minutes ago
# REVIEW ON SUCCESSFUL CRYPTO & FUNDS RECOVERY.
Upon discovering the inability to access invested funds and profits, a distressing situation arose. After investing a significant sum in an investment website, initially with €100, profits surged, prompting further investment. Following the realization of being scammed, DuneNectarWebExpert was contacted. This team provided swift support, successfully recovering lost cryptos. Their assistance in funds recovery is commendable. DuneNectarWebExpert possesses expertise in navigating the crypto realm, with a global network of cyber professionals. After consultation and assurance of a successful outcome, recovery was achieved. Dune NECTAR WEB EXPERT has a proven record of successful recoveries from various online scams. Their exceptional private investigative and recovery services warrant a 5-star rating. DUNENECTARWEBEXPERT is recommended for those seeking to retrieve lost crypto assets and funds. Contact them via:
- Support @dunenectarwebexpert.com
: 9 Months, 3 Weeks, 5 Days, 11 Hours, 4 Minutes ago
I Want To Testify About Dark Web Blank ATM Cards. What'sapp : +2348159250336 (The Official Automatic Teller Machine) They Sell Automatic Blank ATM Cards That You Can Use To Withdraw Money At Any ATM Machine Around The World Wide. Order Your Blank ATM Card Now With The Official Automatic Teller Machine.
What'sapp : +2348159250336
Email Address : carolblankatmcard@gmail.com
: 9 Months, 3 Weeks, 3 Days, 2 Hours, 7 Minutes ago
Are You a Victim of Crypto Hack or Fake Crypto Investment/Mining?
If you've fallen victim to a crypto hack or a fraudulent investment/mining scheme, it’s crucial to act quickly to recover your lost funds. I can personally recommend Morphohack Cyber Service as the best option for recovery.
I was once a victim of crypto fraud, and I felt completely helpless until I found Morphohack. Their team was professional, transparent, and highly skilled in recovering lost funds. They guided me through every step of the process, offering both reassurance and effective solutions.
Morphohack has years of experience in the recovery industry and a strong track record of success. Their team stays up-to-date on the latest trends in crypto fraud, using advanced techniques to trace and recover stolen assets. After doing my own research, I found numerous success stories from other clients who had their funds recovered through Morphohack.
If you’re dealing with crypto theft or scams, don’t wait, reach out to Morphohack. They are a reliable, trusted service with a proven success rate. Don’t let your crypto losses define your financial future, take action and trust the professionals at Morphohack to help you recover your funds. (MORPHOHACK@CYBERSERVICES. COM)
: 9 Months, 6 Days, 5 Hours, 38 Minutes ago
MY OWN EXPERIENCE WITH LOST CRYPTO RETRIEVEMENT!
The Captain Jack Recovery in Bitcoin. Recovering Lost Funds From Online Fraudsters / Bitcoin Mining / Bitcoin Recovery / Improve Your Credit Score and Obtain Authorization for Remote Mobile Spy Control. Extraction of bad records from database systems, both public and private. Captain Jack Recovery can be contacted via Telegram @realcaptainjack or Text +491 5782 317 112
: 8 Months, 4 Weeks, 2 Days, 12 Hours, 50 Minutes ago
RECOVER YOUR SCAMMED FUNDS AND CRYPTOCURRENCY VIA WIZARD LARRY RECOVERY
Get in touch with WIZARD LARRY RECOVERY If a scam has caused you to lose money Many of the recommendations are false, and it's difficult to determine which are genuine. But Wizard Larry and his staff will undoubtedly assist you, I'm sure of it. I had a hard time finding them.
Email...., support@wizardlarryrecovery. c o m
Web......, Wizardlarryrecovery . c o m
WhatsApp....+ (447) - (311) - (146) - (749)
WhatsApp....,+1 (616) - (292) - (4789 )
: 8 Months, 4 Weeks, 2 Days, 12 Hours, 49 Minutes ago
RECOVER YOUR SCAMMED FUNDS AND CRYPTOCURRENCY VIA WIZARD LARRY RECOVERY
Get in touch with WIZARD LARRY RECOVERY If a scam has caused you to lose money Many of the recommendations are false, and it's difficult to determine which are genuine. But Wizard Larry and his staff will undoubtedly assist you, I'm sure of it. I had a hard time finding them.
Email...., support@wizardlarryrecovery. c o m
Web......, Wizardlarryrecovery . c o m
WhatsApp....+ (447) - (311) - (146) - (749)
WhatsApp....,+1 (616) - (292) - (4789 )
: 8 Months, 3 Weeks, 3 Days, 4 Hours, 23 Minutes ago
Cryptocurrency Fraud | Crypto Scam Recovery/Crypto Asset Recovery Services
Many consumers may believe that it is difficult to get their money back from an online scammer. However, it is feasible. I fell prey to a swindle and lost $750,000 to the con artist. I was able to successfully recoup my losses with the assistance of the proper people and firm. I contacted Wizard Larry Recovery Experts, a recovery organization, and they returned my money; the rest is history.
Website......Wizardlarryrecovery. c o m
WhatsApp...+447 (311) 146 749
Email............Wizardlarry@mail. c o m
Telegram.....https://t.me/wizardlarryrecoveryexperts
: 8 Months, 3 Weeks, 3 Days, 4 Hours, 22 Minutes ago
Cryptocurrency Fraud | Crypto Scam Recovery/Crypto Asset Recovery Services
Many consumers may believe that it is difficult to get their money back from an online scammer. However, it is feasible. I fell prey to a swindle and lost $750,000 to the con artist. I was able to successfully recoup my losses with the assistance of the proper people and firm. I contacted Wizard Larry Recovery Experts, a recovery organization, and they returned my money; the rest is history.
Website......Wizardlarryrecovery. c o m
WhatsApp...+447 (311) 146 749
Email............Wizardlarry@mail. c o m
Telegram.....https://t.me/wizardlarryrecoveryexperts
: 6 Months, 4 Weeks, 9 Hours, 57 Minutes ago
HIRE ALMIGHTY RECOVERY COIN,THE BEST CERTIFIED HACKER FOR CRYPTOCURRENCY RECOVERY.
I want to sincerely thank Almighty Recovery Coin professionals for their incredible skill; they are truly outstanding individuals and I wish I had gotten in touch with them sooner rather than reaching out to other cybercriminals for help. If you read this comment, you will definitely be able to recover your stolen or restricted cryptocurrency investment. I am posting it for people who have been affected by cryptocurrency mining, trading, Investments and financial scams.
Email:
almightyrecoverycoin(@) mail . (com)
Website:
almightyrecoveryco.wixsite.com/almighty-recovery-co
WhatsApp:
+53 5 (155) 6969
: 6 Months, 4 Weeks, 9 Hours, 56 Minutes ago
HIRE ALMIGHTY RECOVERY COIN,THE BEST CERTIFIED HACKER FOR CRYPTOCURRENCY RECOVERY.
I want to sincerely thank Almighty Recovery Coin professionals for their incredible skill; they are truly outstanding individuals and I wish I had gotten in touch with them sooner rather than reaching out to other cybercriminals for help. If you read this comment, you will definitely be able to recover your stolen or restricted cryptocurrency investment. I am posting it for people who have been affected by cryptocurrency mining, trading, Investments and financial scams.
Email:
almightyrecoverycoin(@) mail . (com)
Website:
almightyrecoveryco.wixsite.com/almighty-recovery-co
WhatsApp:
+53 5 (155) 6969
: 6 Months, 3 Weeks, 3 Days, 8 Hours, 56 Minutes ago
ETHICAL HACKER IS OVERALL BITCOIN RECOVERY
I was totally discouraged after losing a significant sum of cryptocurrencies to an online investment scam. I reached out to Overall Bitcoin Recovery after looking for reputable assistance. They moved swiftly and with great professionalism. In just a few days, Overall Bitcoin Recovery was able to locate and retrieve [$224,000] of my pilfered funds because of their sophisticated understanding of blockchain forensics. A catastrophic financial loss was transformed into a full recovery because of their skill. I am immensely grateful and heartily endorse Overall Bitcoin Recovery to anyone in need of assistance with misplaced or pilfered cryptocurrency. They work and are sincere. You can reach them right now at
WhatsApp: +393510973309
Email: Overall.recovery@mail.com
: 6 Months, 5 Days, 18 Hours, 5 Minutes ago
Have you lost your cryptocurrencies or been the victim of fraud?
We are able to help you retrieve your belongings!
Detailed Evaluation: One of our services is a comprehensive assessment of your circumstances.
Recovery Techniques: Specialized approaches to recover your funds.
Private Consultation: We respect your right to privacy.
Why do people Trust Our Service?
Qualified Professionals: Our team consists of experienced hacking professionals.
Verified History Record: The assets of multiple clients have been successfully retrieved.
Contact Us Immediately!
Email: professionalwizardrecovery@gmail.com
E-MAIL: professionalwizardrecovery@programmer.net
WHATSAPP (+44 7442 684963)
WEBSITE:(https://professionalwizard.wixsite.com )
: 6 Months, 5 Days, 18 Hours, 4 Minutes ago
Have you lost your cryptocurrencies or been the victim of fraud?
We are able to help you retrieve your belongings!
Detailed Evaluation: One of our services is a comprehensive assessment of your circumstances.
Recovery Techniques: Specialized approaches to recover your funds.
Private Consultation: We respect your right to privacy.
Why do people Trust Our Service?
Qualified Professionals: Our team consists of experienced hacking professionals.
Verified History Record: The assets of multiple clients have been successfully retrieved.
Contact Us Immediately!
Email: professionalwizardrecovery@gmail.com
E-MAIL: professionalwizardrecovery@programmer.net
WHATSAPP (+44 7442 684963)
WEBSITE:(https://professionalwizard.wixsite.com )
: 4 Months, 2 Weeks, 1 Day, 46 Minutes ago
How To Follow-Up on Bitcoin Recovery
Hello [I am Michelle Windham]
I’m reaching out to highlight Marv Web Recovery Bitcoin, The best crypto recovery agent. His expertise in asset recovery has helped many clients regain their investments swiftly and effectively. Should you need assistance with any crypto-related issues, don’t hesitate to contact Marv Web Crypto Recovery. For more details see below
Email:.. marv.web(@)mail.com
WhatsApp:... +601126730582
Website:.. https://marvweb9.wixsite.com/marv-web-crypto-expe
Warm regards,
: 4 Months, 1 Week, 4 Days, 2 Hours, 7 Minutes ago
Lost Recovery Services
If you've lost access to your Bitcoin or other cryptocurrencies, ALMIGHTY RECOVERY can help. Their team employs proven methods to recover lost funds, providing support through every step of the process. This service is crucial for those who may have forgotten passwords or lost recovery keys.
Email,.. almightyrecoverycoin(@) mail . (com)
WhatsApp,.. +53 5 (155) 6969
Website,.. almightyrecoveryco.wixsite.com/almighty-recovery-co
: 4 Months, 1 Week, 2 Days, 3 Hours, 53 Minutes ago
After falling victim to a fake crypto investment platform, I lost nearly $73,000 in Ethereum. The scammers disappeared overnight, and I honestly thought my money was gone forever. A friend recommended Wizard James Recovery (Wizardjamesrecovery @ usa . com), and although I was hesitant at first, I decided to give it one last try. Their team handled my case professionally, kept me updated throughout the process, and used blockchain tracing methods I didn’t even know were possible. Within weeks, they were able to help me recover my funds. I’m incredibly grateful for their dedication and transparency. If you’ve been scammed in crypto, don’t lose hope contact Wizard James today
: 4 Months, 1 Week, 2 Days, 40 Minutes ago
Comprehensive Bitcoin Transaction Monitoring
With Marv Web Hacker, not only can you recover your assets, but you can also track and monitor all your Bitcoin transactions. Our sophisticated tools allow you to keep an eye on your investments, ensuring that you're always informed about your financial status.
Email,..marv.web@mail.com
WhatsApp,..+601126730582
Website,.. https://marvweb9.wixsite.com/marv-web-crypto-expe
: 4 Months, 4 Days, 23 Hours, 33 Minutes ago
HOW TO HIRE A HACKER
I cannot emphasize enough how transformative my experience with Almighty Recovery Hacker has been. After countless sleepless nights worrying about my lost investment, their expertise provided me with the guidance and reassurance I desperately needed. They not only recovered my funds but also educated me about safeguarding my assets in the future.
Email,.. almightyrecoverycoin@mail . c o m
Website,.. almightyrecoveryco.wixsite.com/almighty-recovery-co
Whatsapp,.. +5.3.5.1.5.5.6.9.6.9
: 4 Months, 4 Days, 23 Hours, 32 Minutes ago
HOW TO HIRE A HACKER
I cannot emphasize enough how transformative my experience with Almighty Recovery Hacker has been. After countless sleepless nights worrying about my lost investment, their expertise provided me with the guidance and reassurance I desperately needed. They not only recovered my funds but also educated me about safeguarding my assets in the future.
Email,.. almightyrecoverycoin@mail . c o m
Website,.. almightyrecoveryco.wixsite.com/almighty-recovery-co
Whatsapp,.. +5.3.5.1.5.5.6.9.6.9
: 4 Months, 4 Days, 23 Hours, 31 Minutes ago
HOW TO HIRE A HACKER
I cannot emphasize enough how transformative my experience with Almighty Recovery Hacker has been. After countless sleepless nights worrying about my lost investment, their expertise provided me with the guidance and reassurance I desperately needed. They not only recovered my funds but also educated me about safeguarding my assets in the future.
Email,.. almightyrecoverycoin@mail . c o m
Website,.. almightyrecoveryco.wixsite.com/almighty-recovery-co
Whatsapp,.. +5.3.5.1.5.5.6.9.6.9
: 4 Months, 1 Day, 23 Hours, 8 Minutes ago
How to Track And Recover Bitcoin
Hello [ I Am Maria Santos],
I'm writing to recommend Almighty Recovery Bitcoin, the top cryptocurrency recovery service. His proficiency in asset recovery has enabled numerous clients to quickly and successfully recover their investments. Please get in touch with Almighty Recovery Hacker if you need help with any cryptocurrency-related problems; further information is provided below.
Email.., almightyrecoverycoin@mail.com
Whatsapp.., +53 51 55 6969
Website.., almightyrecoveryco.wixsite.com/almighty-recovery-co
Best wishes,
: 3 Months, 4 Weeks, 1 Day, 2 Hours, 12 Minutes ago
Erasing Criminal Records and Social media Hacks
Struggling with school grades? You're not alone. Many students face difficulties in their studies due to various reasons, . With Web Marv Hacker, you can gain access to resources and strategies that will help you enhance your academic performance.A criminal record also can have lasting impacts on your life, affecting employment opportunities, housing options, and even personal relationships. If you're looking to start fresh, Consult Web Marv Hacker
Email,..marv.web@mail.com
WhatsApp,..+601126730582
Web:.,https://marvweb9.wixsite.com/marv-web-crypto-expe
: 3 Months, 3 Weeks, 6 Days, 4 Minutes ago
How I Managed to Recover My Lost Bitcoin
After being scammed by a fraudulent online investment platform, I honestly believed my Bitcoin was gone for good. The platform suddenly stopped responding, and every attempt I made to withdraw my funds failed. I later sought professional assistance to investigate the transactions. The process involved analyzing my wallet activity and tracing the movement of the funds on the blockchain. Throughout the process, I received helpful guidance on how to report the scam and pursue recovery options. Thankfully, I was able to recover part of my stolen Bitcoin. It was a stressful experience, but it taught me to be far more careful with online investment platforms and to always verify their legitimacy before sending any funds.
Mail: wizardjamesrecovery@usa.com
WA Only: +447418367204
: 3 Months, 3 Weeks, 2 Days, 8 Hours, 6 Minutes ago
Bitcoin Outstanding Results From MarvWeb
The work done by MarvWeb Recovery Experts was nothing short of excellent. They employed a variety of strategies and tools tailored specifically to my case, demonstrating their deep knowledge of both technology and law enforcement procedures. Thanks to their diligent efforts, I am thrilled to report that a significant portion of my stolen Bitcoin has been successfully recovered.
Webmail,.. https://marvweb9.wixsite.com/marv-web-crypto-expe
Email,........ marv.web@mail.com
WhatsApp..... +601126730582
: 3 Months, 3 Weeks, 2 Days, 8 Hours, 5 Minutes ago
Bitcoin Outstanding Results From MarvWeb
The work done by MarvWeb Recovery Experts was nothing short of excellent. They employed a variety of strategies and tools tailored specifically to my case, demonstrating their deep knowledge of both technology and law enforcement procedures. Thanks to their diligent efforts, I am thrilled to report that a significant portion of my stolen Bitcoin has been successfully recovered.
Webmail,.. https://marvweb9.wixsite.com/marv-web-crypto-expe
Email,........ marv.web@mail.com
WhatsApp..... +601126730582
penelope: 3 Months, 2 Weeks, 3 Days, 23 Hours, 22 Minutes ago
Expertise in Recovery
Safeguard is not just another name in the crowded field of cryptocurrency recovery; they are renowned for their effectiveness and expertise in tracing lost funds. Their team comprises skilled professionals who understand the intricate workings of blockchain technology and the tactics employed by online scammers. This specialized knowledge enables them to devise tailored strategies to recover your assets.
Email: safeguardbitcoin@consultant.com
WhatsApp: +44 7426 168300
Website: https://safeguardbitcoin.wixsite.com/safeguard-bitcoin--1
: 3 Months, 2 Weeks, 3 Days, 1 Hour, 43 Minutes ago
A Grateful Testimonial for Almighty Recovery Experts
When it comes to navigating the complex world of cryptocurrency, especially after experiencing a theft, finding the right support can be daunting. Recently, I found myself in a situation where my Bitcoin was stolen by online scammers. It was a distressing experience that left me feeling vulnerable and helpless. However, reaching out toAlmighty Hacker Experts turned out to be one of the best decisions I have ever made.
Webmail,.. almightyrecoveryco.wixsite.com/almighty-recovery-co
Email,........ almightyrecoverycoin@mail.com
WhatsApp..... +53 51 55 6969
: 3 Months, 1 Week, 4 Days, 15 Hours, 34 Minutes ago
I NEED A HELP HOW TO RECOVER MY LOST CRYTOPCURRENCY
I’m one of the fortunate individuals who ventured into the cryptocurrency market with hopes of building a nest egg for retirement. Sadly, I invested in a fraudulent platform that ended up scamming me out of approximately $250,000, not including the promised profits. I lost everything, including funds borrowed from friends in my investment quest. Just when I thought all was lost, I discovered the cryptocurrency recovery experts at VERTEX DIGITAL ASSETS RECOVERY. They successfully helped me recover my funds within 72 hours, and I was even able to track down the scammers. I am incredibly thankful for their assistance and strongly recommend their services to anyone facing a similar situation.
Reach out to them today and turn your situation around!
CONTACT: VERTEX DIGITAL ASSETS RECOVERY
WhatsApp: +1 (305) 452-9075
Email: vertexdigitalassetsrecovery@outlook.com
: 3 Months, 1 Week, 3 Days, 59 Minutes ago
Losing my crypto was one of the most frustrating moments I’ve ever experienced. I had invested a lot of time and money, so discovering that my funds were gone left me feeling shocked and discouraged. I spent days trying to figure out what went wrong and searching for possible solutions.
In this fictional situation, working with Wizard James Recovery gave me a sense of direction during a very confusing time. The process felt organized, and I appreciated how each step was explained in simple terms. I was guided on what information was needed and how recovery attempts generally work, which helped me feel more confident and less overwhelmed.
What stood out the most in this story was the patience shown throughout the process. I learned valuable lessons about protecting private keys, recognizing suspicious links, and strengthening my wallet security to prevent future losses. The overall experience, in this fictional review, felt like a turning point that helped me rebuild trust in managing my digital assets.
Looking back, the situation taught me the importance of staying cautious online and always taking extra steps to secure crypto investments.
For more info: +447418367204
Phone/whatsapp: Wizardjamesrecovery@usa.com
: 3 Months, 5 Days, 23 Hours, 55 Minutes ago
I never imagined I would experience losing my crypto, but when it happened, it felt overwhelming and confusing. I kept replaying everything in my mind, trying to understand where I went wrong and how I could possibly fix the situation. It was a stressful period filled with uncertainty. In this fictional scenario, working with Wizard James Recovery helped me feel less alone during the process. The experience felt structured, and I appreciated how the situation was reviewed carefully before any steps were taken. Everything was explained in a way that made it easier to understand what had happened and what options were available. One of the biggest takeaways for me in this story was the importance of patience. Recovery did not happen instantly, but the steady progress gave me hope. Along the way, I learned how to better secure my accounts, recognize warning signs, and protect my digital assets from similar risks in the future. Overall, this fictional experience taught me that even in difficult situations, staying calm, learning from mistakes, and improving security habits can make a big difference moving forward.
James's WhatsApp number is ( + 4 4 7 4 1 8 3 6 7 2 0 4 )
: 3 Months, 2 Days, 13 Hours, 15 Minutes ago
Discover the Best Bitcoin Recovery Company: WebMarv Recovery Hacker
If you’ve ever found yourself in the unfortunate situation of losing access to your Bitcoin or falling victim to a scam, you know how critical it is to find a reliable recovery service. In the realm of Bitcoin recovery, one name stands out above the rest: *WebMarv Recovery Hacker*. If you're searching for the surest Bitcoin recovery company, look no further—WebMarv is your best bet.
Webmail,.. https://marvweb9.wixsite.com/marv-web-crypto-expe
Email,........ marv.web@mail.com
WhatsApp..... +601126730582
: 3 Months, 22 Hours, 46 Minutes ago
I never imagined I would experience losing my crypto, but when it happened, it felt overwhelming and confusing. I kept replaying everything in my mind, trying to understand where I went wrong and how I could possibly fix the situation. It was a stressful period filled with uncertainty. In this fictional scenario, working with Wizard James Recovery helped me feel less alone during the process. The experience felt structured, and I appreciated how the situation was reviewed carefully before any steps were taken. Everything was explained in a way that made it easier to understand what had happened and what options were available. One of the biggest takeaways for me in this story was the importance of patience. Recovery did not happen instantly, but the steady progress gave me hope. Along the way, I learned how to better secure my accounts, recognize warning signs, and protect my digital assets from similar risks in the future. Overall, this fictional experience taught me that even in difficult situations, staying calm, learning from mistakes, and improving security habits can make a big difference moving forward. For more inquiries send an email to Wizardjamesrecovery@usa.com
patra: 2 Months, 4 Weeks, 2 Days, 8 Hours, 28 Minutes ago
Why Choose Web Marv Recovery Hacker?
If you’ve been affected by fraudulent investment schemes and are struggling to reclaim your lost Bitcoin, don’t hesitate to reach out. WebMarv Hacker is here to assist you in tracing and recovering your funds with our expert services. Contact us today and take the first step towards reclaiming your financial future.
Email,........marv.web@mail.com
WhatsApp.....+601126730582
Web.......https://marvweb9.wixsite.com/marv-web-crypto-expe
: 2 Months, 3 Weeks, 5 Days, 9 Hours, 54 Minutes ago
I am incredibly grateful for the help I received from Wizard James Recovery. After losing access to my crypto, I felt frustrated and hopeless, not knowing if I would ever see my funds again. Their team was professional, patient, and kept me informed throughout the entire process. Within a short time, they were able to assist me in recovering my crypto back to my wallet safely. The experience restored my confidence, and I truly appreciate their dedication and support. I would highly recommend their services to anyone facing similar challenges. For more inquiries= Wizardjamesrecovery@usa.com
: 2 Months, 2 Weeks, 5 Days, 21 Hours, 49 Minutes ago
I am truly thankful for the help I received from Wizard James Recovery after I lost my Bitcoin to an online scam. It was a very stressful experience, and I felt hopeless when I realized my funds were gone and I could not access my wallet anymore. After searching for possible solutions, I decided to contact Wizard James Recovery. From the moment I reached out, they treated my case seriously and guided me step by step through the recovery process. They were patient, professional, and always kept me updated on the progress. To my surprise and relief, they were able to recover my lost Bitcoin and return it to my wallet. I cannot fully express how grateful I felt when I finally saw my funds restored. It gave me peace of mind and restored my confidence. I strongly recommend Wizard James Recovery to anyone who has lost their cryptocurrency and is looking for reliable assistance. Their dedication and knowledge made a huge difference for me, and I will always appreciate their support. Feel free to contact the great wizard via WhatsAPP: +.4.4.7.4.1.8.3.6.7.2.0.4.
patra: 2 Months, 2 Weeks, 3 Days, 13 Hours, 35 Minutes ago
Why Choose Web Marv Recovery Hacker?
If you’ve been affected by fraudulent investment schemes and are struggling to reclaim your lost Bitcoin, don’t hesitate to reach out. WebMarv Hacker is here to assist you in tracing and recovering your funds with our expert services. Contact us today and take the first step towards reclaiming your financial future.
Email,........marv.web@mail.com
: 2 Months, 2 Weeks, 1 Day, 17 Minutes ago
Legitimate Cryptocurrency Recovery Firm in 2026 ; Visit ALMIGHTY CRYPTO RECOVERY SERVICES
For their outstanding assistance, I am immensely appreciative of ALMIGHTY CRYPTO RECOVERY SERVICES. I was depressed after losing $61,000 in Bitcoin last month. Their team tracked and successfully recovered my assets using revolutionary cryptocurrency analysis in an honest and professional manner. They gave me comfort during a trying period by keeping me informed at every stage. To anyone experiencing comparable cryptocurrency losses, I recommend their great services. Their information is listed below.
Mail-Box: almightyrecoverycoin@mail.com
WhatsApp: +53 51 55 6969
: 2 Months, 2 Weeks, 1 Day, 12 Minutes ago
Legitimate Cryptocurrency Recovery Firm in 2026 ; Visit ALMIGHTY CRYPTO RECOVERY SERVICES
For their outstanding assistance, I am immensely appreciative of ALMIGHTY CRYPTO RECOVERY SERVICES. I was depressed after losing $61,000 in Bitcoin last month. Their team tracked and successfully recovered my assets using revolutionary cryptocurrency analysis in an honest and professional manner. They gave me comfort during a trying period by keeping me informed at every stage. To anyone experiencing comparable cryptocurrency losses, I recommend their great services. Their information is listed below.
Mail-Box: almightyrecoverycoin@mail.com
WhatsApp: +53 51 55 6969
: 2 Months, 1 Week, 6 Days, 11 Hours, 47 Minutes ago
Expertise in Cryptocurrency Recovery
MarvWeb Hacker specializes in recovering lost or stolen cryptocurrencies. Their team consists of highly skilled professionals who understand the intricacies of blockchain technology and the various methods employed by cybercriminals. With years of experience under their belt, they have successfully helped countless individuals reclaim their assets.
Address:
Email...Marv.web@mail.com/WhatsApp +601126730582
: 2 Months, 1 Week, 6 Days, 11 Hours, 46 Minutes ago
Expertise in Cryptocurrency Recovery
MarvWeb Hacker specializes in recovering lost or stolen cryptocurrencies. Their team consists of highly skilled professionals who understand the intricacies of blockchain technology and the various methods employed by cybercriminals. With years of experience under their belt, they have successfully helped countless individuals reclaim their assets.
Address:
Email...Marv.web@mail.com/WhatsApp +601126730582
: 2 Months, 1 Week, 6 Days, 1 Hour, 40 Minutes ago
FOR BITCOIN RECOVERY CONSULT AN EXPERT/ MARV WEB SPECIALIST
My close friend suggested MARV WEB RECOVERY to me, and even though I was uncertain about them Initially, I wrote to them and they assisted me in recovering my bitcoin that had been stolen from online fraudsters. I would like to express my gratitude to the entire crew for making the recovery a complete success. contact them through WhatsApp; (+601126730582)
Mail Box; Marv.web@mail.com
: 2 Months, 1 Week, 3 Days, 12 Hours, 52 Minutes ago
ALPHA KEY RECOVERY IS THE BEST DATA RECOVERY EXPERT, AND I CAN REFER ANYONE.
Investing in cryptocurrency is not a scam, and those who do so are currently making large sums of money. I won't lie because I am a living witness to both cryptocurrency investments and the proper way to proceed with them. I am grateful to Alpha Key Recovery for their assistance and patience during my depressing moment after being duped by a fraudulent investment company. Get in touch with Alpha Key Recovery today to be a living witness.
Mail:Service@alphakeyrecovery.com
WhatsApp: +15714122170
Website: www.alphakeyrecovery.com
: 2 Months, 1 Week, 3 Days, 12 Hours, 52 Minutes ago
ALPHA KEY RECOVERY IS THE BEST DATA RECOVERY EXPERT, AND I CAN REFER ANYONE.
Investing in cryptocurrency is not a scam, and those who do so are currently making large sums of money. I won't lie because I am a living witness to both cryptocurrency investments and the proper way to proceed with them. I am grateful to Alpha Key Recovery for their assistance and patience during my depressing moment after being duped by a fraudulent investment company. Get in touch with Alpha Key Recovery today to be a living witness.
WhatsApp: +15714122170
: 2 Months, 1 Week, 1 Day, 8 Hours, 42 Minutes ago
Finally Resolved My Starlight Capital Plus Ordeal
After months of frustration, I feel relieved enough to write this. I was with Starlight Capital Plus, gradually building my portfolio until it was showing over $80k in value. Then, almost overnight, the performance across every portfolio collapsed. If it had been just one or two investments, I could understand the risk, but this was across the board.
To make things worse, the follow-up calls I received were more focused on getting me to commit more funds rather than addressing the sudden losses. It felt like I had no path to resolution and no way to retrieve my balance.
It wasn’t until I contacted Bitreclaim, com a highly skilled digital forensics and smart contract audit team, that I finally saw progress. Their 24/7 support via WhatsApp (+1 347 753 4233) guided me through preparing a detailed report with all my transaction records, wallet addresses, and transfer IDs. Within weeks, I was able to recover AUD $76k directly into my Trust Wallet.
If anyone else is dealing with unresolved account losses or irregular portfolio collapses, I strongly suggest preparing your documentation and opening a detailed case. In my experience, the sooner you act, the higher the chance of a positive outcome.
: 2 Months, 1 Week, 1 Day, 8 Hours, 41 Minutes ago
Finally Resolved My Starlight Capital Plus Ordeal
After months of frustration, I feel relieved enough to write this. I was with Starlight Capital Plus, gradually building my portfolio until it was showing over $80k in value. Then, almost overnight, the performance across every portfolio collapsed. If it had been just one or two investments, I could understand the risk, but this was across the board.
To make things worse, the follow-up calls I received were more focused on getting me to commit more funds rather than addressing the sudden losses. It felt like I had no path to resolution and no way to retrieve my balance.
It wasn’t until I contacted Bitreclaim, com a highly skilled digital forensics and smart contract audit team, that I finally saw progress. Their 24/7 support via WhatsApp (+1 347 753 4233) guided me through preparing a detailed report with all my transaction records, wallet addresses, and transfer IDs. Within weeks, I was able to recover AUD $76k directly into my Trust Wallet.
If anyone else is dealing with unresolved account losses or irregular portfolio collapses, I strongly suggest preparing your documentation and opening a detailed case. In my experience, the sooner you act, the higher the chance of a positive outcome.
: 2 Months, 6 Days, 17 Minutes ago
THE ONLY LICENSED CRYPTO EXPERT HERE IS REMINDERED BY ALPHA KEY RECOVERY
I was duped by dishonest online brokers four months ago and believed my money was lost forever. I collaborated with ALPHA KEY RECOVERY HACKER after thorough investigation. They assisted me in getting some of my assets back, managed the procedure expertly, and had good communication.
Although I had a good experience, I strongly advise folks to conduct their own research and exercise caution when working with recovery services and investments.
Mail : service@alphakeyrecovery.com
WhtasApp: +15714122170
Signal : +15403249396
Website : www.alphakeyrecovery.com
: 2 Months, 6 Days, 17 Minutes ago
THE ONLY LICENSED CRYPTO EXPERT HERE IS REMINDERED BY ALPHA KEY RECOVERY
I was duped by dishonest online brokers four months ago and believed my money was lost forever. I collaborated with ALPHA KEY RECOVERY HACKER after thorough investigation. They assisted me in getting some of my assets back, managed the procedure expertly, and had good communication.
Although I had a good experience, I strongly advise folks to conduct their own research and exercise caution when working with recovery services and investments.
Mail : service@alphakeyrecovery.com
WhtasApp: +15714122170
Signal : +15403249396
: 2 Months, 5 Days, 23 Hours, 6 Minutes ago
After losing my Bitcoin to an online investment scam, I thought it was gone for good. With professional recovery assistance (Wizard James Recovery), I was able to trace the transactions and recover part of my funds. It was a difficult experience, but I’m grateful for the support and outcome. Get In touch with them via email: Wizardjamesrecovery@usa.com
nobertgusto: 2 Months, 5 Days, 10 Hours, 9 Minutes ago
EXCELLENT CRYPTOCURRENCY RECOVERY CONTACT ALMIGHTY HACKER
Only a small number of skilled hackers has the special hacking abilities and knowledge needed to recover lost Bitcoin. Even if there are a lot of recovery websites available, it's crucial to exercise caution because 95% of them are run by scammers that pose as legitimate. However, you should look for a reliable hacker who can assist you in getting your money back, such as Almighty Recovery Coin. I lost $113k worth of Bitcoin due to mining, but they were able to retrieve it. Write to Almighty Recovery via email ( almightyrecoverycoin@mail.com ) or WhatsApp +53 51 55 6969
Webmail; almightyrecoveryco.wixsite.com/almighty-recovery-co
nobertgusto: 2 Months, 5 Days, 10 Hours, 8 Minutes ago
EXCELLENT CRYPTOCURRENCY RECOVERY CONTACT ALMIGHTY HACKER
Only a small number of skilled hackers has the special hacking abilities and knowledge needed to recover lost Bitcoin. Even if there are a lot of recovery websites available, it's crucial to exercise caution because 95% of them are run by scammers that pose as legitimate. However, you should look for a reliable hacker who can assist you in getting your money back, such as Almighty Recovery Coin. I lost $113k worth of Bitcoin due to mining, but they were able to retrieve it. Write to Almighty Recovery via email ( almightyrecoverycoin@mail.com ) or WhatsApp +53 51 55 6969
Webmail; almightyrecoveryco.wixsite.com/almighty-recovery-co
: 1 Month, 4 Weeks, 2 Days, 23 Hours, 38 Minutes ago
After my crypto was stolen, I felt completely lost and didn’t think I would ever get it back. Working with Wizard James Recovery (wizardjamesrecovery@usa.com) gave me hope again. They were patient, supportive, and very clear about every step involved. Their professionalism and commitment made a big difference, and I truly appreciate the effort they put into helping me restore my stolen crypto. I’m thankful for their assistance and would gladly recommend their services to others in need.
janetmurphy: 1 Month, 4 Weeks, 2 Days, 1 Hour, 23 Minutes ago
TO SUCCESSFULLY RECOVER LOST CRYPTO EMBRACE ALMIGHTY RECOVERY COIN
While cryptocurrencies like Bitcoin, USDT, Ethereum, and others have created new avenues for profit, they have also made it easier for sophisticated online fraud to thrive. Scams including Bitcoin, FX trading, phishing, fake identities, and deceptive investment platforms have claimed many lives. Our goal at Almighty Recovery Coin Experts is to assist victims of these crimes by using expert research and cyber intelligence without adding to their financial difficulty.
The possibility of losing even more funds while attempting to recover the money stolen before, is one of the main worries of scam victims. We don't charge up front because of this. Following a successful recovery, our clients simply pay a percentage fee.
Email... almightyrecoverycoin@mail.com
WhatsApp... +53 51 55 6969
Website... almightyrecoveryco.wixsite.com/almighty-recovery-co
: 1 Month, 4 Weeks, 1 Day, 11 Hours, 29 Minutes ago
ETHICAL HACKER FOR HIRE
WIZARD LARRY RECOVERY is the best cryptocurrency recovery expert to carry out your request and provide solutions to your bitcoin recovery problems. They provide their clients with tailor made asset recovery plans that match their budget and take into account the individual aspects of the case, providing their clients with the best value for their hard earned money.
WEBSITE ADDRESS. www.wizardlarryrecovery.com
EMAIL ADDRESS. Wizardlarry@mail.com
: 1 Month, 4 Weeks, 1 Day, 9 Hours, 53 Minutes ago
BEST RECOVERY BITCOIN EXPERTS
Hey there! If you're looking to recover from online fraud, check out MarvWeb Recovery Bitcoin. They've got a sharp team that's super smart. Give 'em a shout for a quick response - you'll thank me later!
ADDRESS
Website, https://marvweb9.wixsite.com/marv-web-crypto-expe
Email, marv.web@mail.com
: 1 Month, 3 Weeks, 6 Days, 21 Hours, 56 Minutes ago
I want to sincerely share my experience with Wizard James Recovery for helping me recover my lost Bitcoin. After falling victim to a fake cryptocurrency investment scheme, I lost access to my funds and felt completely helpless. I had almost accepted that my Bitcoin was gone forever. A friend recommended Wizard James Recovery, and I decided to give them a try. From the very first conversation, they were understanding, responsive, and professional in handling my case. They carefully reviewed my situation and assured me they would do their best to assist. After some time, I received the good news that my lost Bitcoin had been successfully recovered. Seeing my funds returned brought me so much relief and happiness. I honestly did not think recovery was possible, but they proved otherwise. I am deeply grateful to Wizard James Recovery for their support and effort. If you are facing a similar situation, I highly recommend WIZARDJAMESRECOVERY@USA.COM
: 1 Month, 3 Weeks, 4 Days, 12 Hours, 49 Minutes ago
I’m at a loss for how to express this. My sister welcomed twin daughters in July and I found myself in a difficult financial and emotional state. I am known as Celta Vallecano and during my quest to find quick cash, I came across an advertisement claiming that Lord Meduza provides precise numbers to those genuinely selected for freedom from financial struggles through his genuine spell.. I felt compelled to take a chance, and ever since reaching out to Lord Meduza, my life has significantly improved. As I write this, I am now a winner of €221 Million Euros after adhering to all the guidance and utilizing the MEGA MILLIONS numbers provided by Lord Meduza. I want to express my high gratitude for the fact that assistance is indeed possible to get regardless of how difficult your circumstances may seem. I highly recommend him in case you require any assistance, simply Whats--App +1 807 798 3042 or Email; lordmeduzatemple@hotmail.com and for more inquiring visit; lordmeduzatemple.com
: 1 Month, 3 Weeks, 23 Hours, 47 Minutes ago
I am very pleased with the support I received from Wizard James Recovery after I lost my cryptocurrency through a fake investment platform. I was heartbroken and thought I had lost my Bitcoin forever. After hearing about their services, I decided to contact them and explain my situation. Their team responded quickly, treated me with respect, and worked diligently on my case. They provided updates along the way, which gave me hope during a very stressful time. To my relief, they were able to assist in recovering my lost Bitcoin. I truly appreciate their professionalism and commitment. If you have experienced a crypto-related loss, I can confidently say that Wizard James Recovery provided me with a positive and reassuring experience. Contact details: wizardjamesrecovery@usa.com
: 1 Month, 2 Weeks, 3 Days, 23 Hours, 45 Minutes ago
I never thought I would recover anything after losing my Bitcoin to a fake online investment platform. At first, I blamed myself and assumed the funds were gone forever. After taking time to gather my transaction history and seek professional guidance, I learned there were still steps I could take. The recovery process required patience, documentation, and careful investigation of the wallet transactions. I was guided through reporting procedures and blockchain tracing, which helped me better understand what had happened. Thankfully, I was able to recover part of my stolen Bitcoin. The experience taught me to be extra cautious with online investments and to always research platforms thoroughly before sending funds. Email them for assistance at: wizardjamesrecovery@usa.com
: 1 Month, 1 Week, 3 Days, 1 Hour, 7 Minutes ago
I am extremely pleased with the assistance I received from Wizard James Recovery. After my crypto assets were stolen, I felt overwhelmed and uncertain about whether recovery was even possible. Their team was professional, attentive, and committed to helping me throughout the process. They provided clear guidance, maintained regular communication, and worked diligently on my case. Thanks to their efforts, I was able to restore my stolen crypto. I appreciate their dedication and would recommend their services to anyone facing a similar situation. Recovery Specialist Email: Wizardjamesrecovery@usa.com
: 1 Month, 5 Days, 7 Hours, 48 Minutes ago
After losing access to my cryptocurrency due to a phishing incident, I was stressed and unsure of what to do next. I had no idea how the transaction happened or whether there was any realistic chance of getting anything back. It felt like a very confusing and emotional situation. In this fictional scenario, I came across Wizard James Recovery (His personal Whatsapp number +447418367204) and reached out for guidance. The process focused mainly on reviewing what happened, explaining how crypto scams typically work, and helping me understand the transaction trail. While nothing was promised, I appreciated having someone break things down in a clear and structured way. The most helpful part of the experience was the education I received. I learned how important it is to protect seed phrases, verify every transaction carefully, and avoid connecting wallets to unknown sites. It made me realize how easily mistakes or scams can happen in the crypto space.
: 1 Month, 3 Days, 4 Hours, 57 Minutes ago
HIRE BEST RECOVERY HACKER CRYPTOCURRENCY /BANK ACCT RECOVERY/ MARK WIZARD HACKERS RECOVERY
Crypto can be recovered when you meet the right hacker expert, i made a research by wizard mark hackers recovery, i contacted them and they did a wonderful job for me in retrieving back my lost bitcoin worth thousands of Dollars, you can also give them a try , they are also specailize in
Any kind of Bank acct Recovery, Instagram, X twitter, Tiktok, FB and other platforms Recovery,Wizard Mark Hackers Recovery
Email: :Markwizard23@gmail.com WHATSAPP +4915218465599 TELEGRAM : @wizardhackersrecovery WEBSITE: https://wizardhackersrecovery.mystrikingly.com/
: 1 Month, 11 Hours, 36 Minutes ago
I want to express my appreciation for the assistance I received from Wizard James Recovery. After losing my Bitcoin to a fraudulent online investment scheme, I felt completely hopeless and didn’t know where to turn. I contacted Wizard James Recovery, and they handled my case with professionalism and care. They took the time to understand my situation, answered my questions, and kept me informed throughout the process. Thanks to their dedication and expertise, I was able to recover my lost Bitcoin. The experience gave me peace of mind and renewed confidence after a very difficult situation. I am grateful for their support and would recommend Wizard James Recovery to anyone seeking help with cryptocurrency recovery. Company’s WhatsApp number is + 4 4 7 4 1 8 3 6 7 2 0 4
: 4 Weeks, 1 Day, 1 Hour, 37 Minutes ago
I’m a testament that miracles happen. When I turned 18, My grandfather encouraged me to buy a lottery ticket for fun but I wasn’t pleased with the way I kept on playing without winning. I was eager to learn more about how to win the lottery and when I searched the internet I found numerous articles saying how they won the lottery through his spells and I decided to give it a try by contacting Lord Meduza. I’d love to say that this man is such a sweet soul who got my back all through the process of making me a lottery spell to win the lottery. The numbers he gave me won me the LOTTO 6/49 Gold Ball of a whopping $48,000,000 Million Canadian Dollars. Right now, my family and I are blessed. Thank you LORD MEDUZA for making this win come true for me and my family. Anyone that needs his help can go to his website: lordmeduzatemple.com or Email: lordmeduzatemple@hotmail.com or Whats_App: +1 807 798 3042 to learn more about his works..
: 4 Weeks, 4 Hours, 6 Minutes ago
MARK WIZARD HACKERS RECOVERY CRYPTOCURRENCY CYBER EXPERTISE BANK ACCT RECOVERY
I Invested 780k USDT in an online cryptocurrency investment platform and I was scammed out of everything! I lost hope and all my efforts, i saw someone talking about wizard mark hackers crypto recovery, i contacted them and i followed up with their procedures of recovery, they also good in other kind of hacking recovery like cryptocurrency, forex, or binary options scam, Bank account, Instagram, X twitter, Tiktok, FB and other platforms,Wizard Mark Hackers Recovery just retrieve my funds worth $490,700 BTC from fake Binance. I am so glad right now. all thanks to Wizard Mark Hackers Recovery and the great help that was render to me.
Email: :Markwizard23@gmail.com WHATSAPP +4915218465599 TELEGRAM : @wizardhackersrecovery
WEBSITE: https://wizardhackersrecovery.mystrikingly.com/
: 4 Weeks, 4 Hours, 5 Minutes ago
MARK WIZARD HACKERS RECOVERY CRYPTOCURRENCY CYBER EXPERTISE BANK ACCT RECOVERY
I Invested 780k USDT in an online cryptocurrency investment platform and I was scammed out of everything! I lost hope and all my efforts, i saw someone talking about wizard mark hackers crypto recovery, i contacted them and i followed up with their procedures of recovery, they also good in other kind of hacking recovery like cryptocurrency, forex, or binary options scam, Bank account, Instagram, X twitter, Tiktok, FB and other platforms,Wizard Mark Hackers Recovery just retrieve my funds worth $490,700 BTC from fake Binance. I am so glad right now. all thanks to Wizard Mark Hackers Recovery and the great help that was render to me.
Email: :Markwizard23@gmail.com WHATSAPP +4915218465599 TELEGRAM : @wizardhackersrecovery
WEBSITE: https://wizardhackersrecovery.mystrikingly.com/
: 3 Weeks, 4 Days, 12 Hours, 49 Minutes ago
After falling victim to a cryptocurrency investment scam, I lost a substantial amount of Bitcoin and felt completely hopeless. The scammers disappeared without warning, leaving me with no access to my funds and no clear path forward. Determined to explore every available option, I sought professional guidance and learned more about blockchain tracing and recovery procedures. The process required patience, detailed documentation, and consistent follow-up, but it helped me better understand how cryptocurrency transactions can be investigated. Although the experience was stressful, I was ultimately able to recover a portion of my stolen Bitcoin. More importantly, it taught me valuable lessons about online security, due diligence, and the importance of verifying investment opportunities before committing funds. To anyone facing a similar situation, don’t give up too quickly. Document everything, report the incident, and seek legitimate professional advice from WIZARD JAMES RECOVERY[ wizardjamesrecovery@usa.com ]. There may still be options available.
: 3 Weeks, 2 Days, 2 Hours, 45 Minutes ago
HIRE AN EXPERT BITCOIN/CRYPTO SCAM RECOVERY /WIZARD MARK AI HACKERS RECOVERY
Best Crypto Recovery Services, Wizard Mark Hackers Recovery boasts a diverse team of highly skilled professionals with backgrounds in cybersecurity, blockchain technology, softwares and law enforcement. Their expertise enables them to navigate the intricate web of cryptocurrency transactions and Bank scams recovery, identifying fraudulent activities and tracing stolen assets with precision. With a successful history of recovering millions of dollars in stolen or lost cryptocurrency, Wizard Mark Hackers Recovery has established itself as a trusted name in the industry. Their case studies illustrate their commitment to delivering results, providing hope to those who have fallen victim to cybercrime.
I was a victim but Wizard Mark Hackers Recovery help me with an AI Digital recovery and my $980,000 was recovered, incase you have issues about any platform recovery you can also connect with the company
Email (Markwizard23@gmail.com)
Whatsapp : +491 5218 465 599
TELEGRAM : @wizardhackersrecovery
Visit website : https://wizardhackersrecovery.mystrikingly.com/
: 2 Weeks, 1 Day, 22 Hours, 15 Minutes ago
I’m thankful for the support I received from Wizard James Recovery after my crypto was stolen. Their team was courteous, knowledgeable, and kept me informed throughout the recovery process. They handled my case professionally and worked diligently to help restore my funds. I appreciate their commitment and the positive outcome they helped me achieve. I would gladly recommend their services to anyone seeking assistance with crypto recovery via WhatsApp number. +447418367204
: 1 Week, 5 Days, 10 Hours, 11 Minutes ago
I had almost given up after losing my Bitcoin to a scam, believing there was no chance of getting it back. After doing some research, I decided to contact Wizard James Recovery, and it turned out to be one of the best decisions I made. Their team was courteous, knowledgeable, and transparent throughout the entire process. They kept me updated regularly and handled my case with professionalism from beginning to end. I was incredibly relieved when my Bitcoin was successfully recovered. The outcome exceeded my expectations, and I truly appreciate the effort they put into helping me during such a stressful time. I sincerely thank Wizard James Recovery for their excellent service and would recommend them to anyone seeking assistance with cryptocurrency recovery. Wizardjamesrecovery@usa.com
: 1 Week, 2 Days, 16 Hours, 3 Minutes ago
Leading Cryptocurrency Recovery Firm Partners with TREK Tech Corp for Cutting-Edge Asset Recovery in 2026
As the landscape of digital finance evolves in 2026, cryptocurrencies continue to revolutionize the way we transact, invest, and save. However, this rapid growth also brings heightened risks of scams, hacks, and inaccessible wallets. Recovering lost or stolen crypto assets demands the expertise of a trusted recovery partner. TREK Tech Corp (AMR), stands out as the premier crypto recovery company, offering unparalleled solutions powered by advanced blockchain forensics, strategic global alliances, and a client-first approach.
This guide explores why TREK Tech Corp (AMR) remains the top choice for crypto asset recovery in 2026, highlighting their innovative services, emerging industry trends, and answers to common questions to help you reclaim your digital wealth.
Why Choose TREK Tech Corp (AMR)?
The decentralized and pseudonymous nature of cryptocurrencies complicates recovery efforts, especially in cases involving scams, lost seed phrases, or hacked wallets. TREK Tech Corp (AMR) specializes in overcoming these challenges with state-of-the-art technology, legal expertise, and a global network of partnerships, including collaborations with agencies like the FBI’s IC3 and major exchanges such as Binance and Coinbase.
Core Crypto Recovery Services Offered by TREK Tech (AMR):
- Fund Tracing: Utilizing AI-powered blockchain analytics to track transactions across decentralized platforms and privacy coins.
- Access Restoration: Recovering private keys, seed phrases, and inaccessible wallets.
- Legal Collaboration: Working with law enforcement to pursue perpetrators and facilitate asset recovery.
- Exchange Coordination: Engaging with cryptocurrency exchanges to freeze and recover suspicious transactions.
With over £100 million recovered including significant cases involving Bitcoin worth over $12.6 million TREK Tech Corp (AMR) exemplifies industry leadership.
Why TREK Tech Corp (AMR) Is the Best Crypto Recovery Company in 2026:
- Advanced Forensics: Leveraging AI-driven tools to trace complex transactions across multiple blockchains.
- Global Partnerships: Collaborations with law enforcement and exchanges worldwide to maximize recovery success.
- Transparent and Client-Focused: Offering free consultations, regular updates, and success stories such as recovering $380,000 from scams.
- International Reach: Addressing cross-border cases efficiently with a broad network of legal and technical experts.
Contact TREK Tech Corp (AMR) at trektechcorp1@gmail.com for a free consultation and start your recovery today.
Specialized Recovery Services Include:
- Crypto Asset Recovery: Focused on reclaiming assets from lost seed phrases and inaccessible wallets.
- Wallet Recovery: Expert assistance in private key recovery and complex wallet access issues.
Our Proven Process:
1. Initial Assessment: Free case review, transaction analysis, and feasibility evaluation.
2. Customized Strategy: Combining AI tracing, legal actions, and exchange engagement.
3. Execution & Monitoring: Continuous updates, law enforcement involvement, and adaptive tactics.
4. Post-Recovery Support: Security education, 2FA implementation, and scam prevention guidance.
Emerging Industry Trends in 2026:
- Enhanced blockchain analysis with AI and machine learning.
- Stronger regulatory partnerships with entities like the FCA and IC3.
- Increased consumer education to prevent scams, led by trusted firms like TREK Tech Corp (AMR).
Prevention Tips from TREK Tech (AMR):
- Use hardware wallets such as Ledger or Trezor.
- Enable multi-factor authentication (MFA).
- Verify platforms through AMR’s scam database and community insights.
- Stay informed with AMR’s educational resources.
FAQs:
- Q: Does recovery guarantee results?
A: Not always, but TREK Tech Corp (AMR) maximizes success with advanced tools and proven strategies.
- Q: What cases qualify?
A: Hacked wallets, lost private keys, seed phrase loss, scams, and transaction errors.
- Q: How long does recovery take?
A: Ranges from days to months, with rapid responses often within 72 hours.
- Q: What are the costs?
A: Transparent, success-based pricing discussed during free consultations.
Trust TREK Tech Corp (AMR) to handle your crypto recovery needs with integrity, professionalism, and proven results.contact trektechcorp1@gmail.com to begin your journey toward reclaiming your digital assets.
TREK Tech Corp (AMR) is recognized worldwide as a trusted, reliable, and verified leader in crypto asset recovery helping victims restore stolen assets ethically, legally, and effectively with a 98% success rate. Protect your wealth today with the industry’s most trusted partner.
: 1 Week, 2 Days, 15 Hours, 51 Minutes ago
Have you fallen victim to a bitcoin or crypto scam? Don't worry, TREK Tech Corp is here to help you get your lost coins back. Our expert team specializes in recovering funds from fraudulent schemes and can assist you in reclaiming what is rightfully yours. Contact us today for a free consultation and let us help you get back on track. Don't let scammers hold you back any longer, trust TREK Tech Corp to help you recover your lost funds.
Contact email: trektechcorp1@gmail.com / trektechcorp@consultant.com
: 1 Week, 1 Day, 11 Hours, 25 Minutes ago
Good and Verified Legitimate Top 12 Trusted Cryptocurrency Recovery Agency A Guide Review 2026 with, Zeus Crypto Recovery Services
Zeus Crypto Recovery Services provides professional support to
victims of cryptocurrency scams by investigating fraudulent transactions, tracing blockchain activity, and guiding clients through the recovery process. Their experienced team works diligently to identify potential recovery opportunities while maintaining clear communication and confidentiality. With a client-focused approach, Zeus Crypto Recovery Services aims to help scam victims pursue the recovery of lost funds and navigate the complexities of crypto fraud with professionalism and care.
Lean more>>>>Website: https://zeusrecoveryservices.com
WhatsApp: +44 7353 848 036
Telegram: https://t.me/Zeuscryptorecoveryservices
: 4 Days, 10 Hours, 38 Minutes ago
Losing my Bitcoin to an online investment scam was a painful experience. After seeking professional guidance and following the recommended recovery and reporting process, I was able to recover part of my funds. The experience taught me to be far more cautious with online investments and to always verify a platform before sending cryptocurrency.
For more details contact wizardjamesrecovery@usa.com
: 2 Days, 6 Hours, 54 Minutes ago
SEEK ADVICE FROM A LICENSED CRYPTO EXPERT RECOVERY HACKER-ALPHA KEY
I have encountered a few fraudulent companies posing as legitimate businesses and have fallen victim to them twice. However, after discovering Alpha Key Recovery, everything changed. My credit score was fixed, my bank account debit was resolved, and everything was back on check thanks to Alpha Key Recovery's assistance. For these reasons, ALPHA KEY continues to be the best and legal recovery expert will consider referring anyone to. reach out to them on the info below
Mail: services@alphakeyrecovery.com
WhatsApp: +15714122170
Signal : +15403249396
Website : www.retrieval.alphakeyrecovery.com
: 2 Days, 6 Hours, 53 Minutes ago
SEEK ADVICE FROM A LICENSED CRYPTO EXPERT RECOVERY HACKER-ALPHA KEY
I have encountered a few fraudulent companies posing as legitimate businesses and have fallen victim to them twice. However, after discovering Alpha Key Recovery, everything changed. My credit score was fixed, my bank account debit was resolved, and everything was back on check thanks to Alpha Key Recovery's assistance. For these reasons, ALPHA KEY continues to be the best and legal recovery expert will consider referring anyone to. reach out to them on the info below
Mail: services@alphakeyrecovery.com
WhatsApp: +15714122170
Signal : +15403249396
: 17 Hours, 22 Minutes ago
I’m beyond grateful to Dr. Benjamin for changing my life completely! I had been playing the Mega Millions lottery for years without success, until I came across Dr. Benjamin and decided to give his spell casting services a try. After performing a powerful lottery spell for me, everything turned around in the most unbelievable way—I won the Mega Millions jackpot of $670,000,000,00! The experience still feels like a dream come true. Dr. Benjamin was professional, kind, and deeply spiritual throughout the entire process. He guided me with confidence and positive energy, and his work truly produced results beyond my imagination. I highly recommend Dr. Benjamin to anyone who believes in miracles and is ready for a life-changing breakthrough. reach him via drbenjaminlottospell711@gmail.com or WhatsApp: +18588585788.
: 17 Hours, 16 Minutes ago
I’m beyond grateful to Dr. Benjamin for changing my life completely! I had been playing the Mega Millions lottery for years without success, until I came across Dr. Benjamin and decided to give his spell casting services a try. After performing a powerful lottery spell for me, everything turned around in the most unbelievable way—I won the Mega Millions jackpot of $670,000,000,00! The experience still feels like a dream come true. Dr. Benjamin was professional, kind, and deeply spiritual throughout the entire process. He guided me with confidence and positive energy, and his work truly produced results beyond my imagination. I highly recommend Dr. Benjamin to anyone who believes in miracles and is ready for a life-changing breakthrough. reach him via drbenjaminlottospell711@gmail.com or WhatsApp: +18588585788.