Site Sculptor will create your entire website for you including navigation and content management. This tutorial guides you through the process of using Site Sculptor to create your site and getting your site on the web.
You will need the following items before starting this tutorial:
- Dreamweaver CS3 or later
- Site Sculptor 1.0 installed
You should configure your site settings in Dreamweaver prior to creating your site in Site Sculptor. Before you can start using Site Sculptor, you must complete the following:
- Define a site in Dreamweaver.
Go to Site > New Site and specify the Local site folder so that Site Sculptor knows where to save your website's files.
- Have a page open from your site.
Dreamweaver requires a page to be open before you can launch the Site Sculptor interface. If you don't have any pages in your site yet, go to File > New and create a blank page. Then save that page within your new site.
You can use your own custom design to create a Site Sculptor site. Here are a few things to keep in mind.
- Use the Add Layout wizard prior to launching Site Sculptor to create a new Site Sculptor Site Design.
- You can use either a CSS Sculptor preset, or a Dreamweaver template.
For the most flexibility we recommend you use a Dreamweaver template. If you have a CSS Sculptor preset you would like to use, simply create a new page based on that preset and Save the page as a template.
- You will need to create the template editable regions prior to creating your Site Sculptor design. At a minimum, you will need editable regions for: navigation, main content, and footer.
Site Sculptor will create a Content Management area for each of your page's editable regions. So, plan ahead and create editable regions for anything you want to be able to edit later in the CMS.
More information and step-by-step instructions for creating your own custom templates can be found at the following tutorial.
- Creating custom Site Sculptor Site Designs
The following steps guide you through using Site Sculptor to configure the general settings for your site.
- From the WebAssist option of the Dreamweaver menu choose Build Site > New Site Sculptor Site.
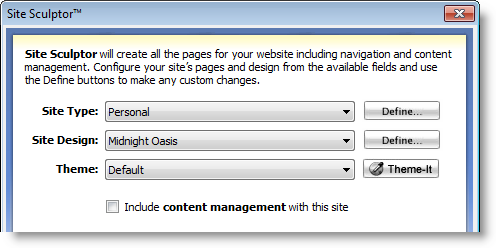
- From the Site Sculptor interface, choose the Site Type that most closely matches the type of site you plan on creating.
Site Types are provided to give you a jump start on your site creation. Once you have chosen a Site Type that is close to what you want, all you need to do is add/remove some pages.
- From the Site Design menu, choose the design you would like to use. If you created a custom site type using the Add Layout wizard, it will be available from this list.
Don't worry if you cannot find a color scheme that best matches the color scheme you want. Using Theme-It you can easily change all the colors in the site design to achieve your own look and feel.
- If available, choose the desired theme from the Theme menu.
There will only be a Default option in the Theme menu until you start saving your own custom themes after modifying designs in Theme-It.
- Select the Include content management with this site checkbox if you wish your site to be built with content management.
In order for Site Sculptor to include content management with your site, the pages that will be created must be PHP pages. This might mean that you will be unable to preview your pages on your local computer. However, this will not be a problem once you upload your site to your hosting provider's server. If you'd prefer HTML pages and do not need the content management feature, do not select this checkbox.
With these settings configured, you could click Finish and Site Sculptor will create your entire site ready for you to upload to your live server. However, in most cases you will want to make some changes to the pages that are created or the design of your site.
Although you have chosen a preset that may match what you are looking for in your website, you may want to make some changes, or add more pages to your site.
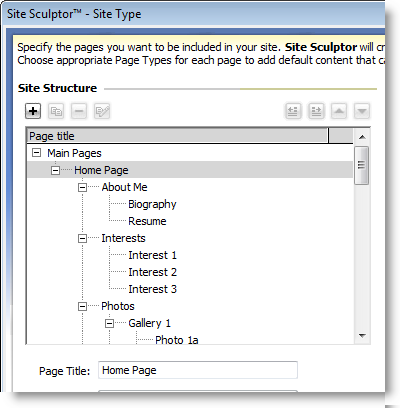
- To manage the pages that are going to be created with your site, click the Define button next to the Site Type menu.
The Site Type interface provides you with a tree structure for managing all the pages that will be created as part of your site. You can add or remove pages, reorder pages, modify the page content and how that page functions in the content management.
Adding, Removing and Reordering pages
The controls above the tree structure allow you to add/remove pages as well as modify your site structure.
- To delete a page, select the page from the tree structure, and select the Remove icon.
- To add a new page, select the page that you wish to add this new page next to and click the Add icon.
- Use the right arrow to move a selected page within the page above it.
- Use the left arrow to move a selected page outside of the page it currently resides within.
- Use the up and down arrows to move a selected page up or down in the menu structure.
This will effect how items are listed in the navigation.
- Once you've made all the desired changes, you will probably want to preview your page. Click the preview graphic on the right to launch a preview in your browser.
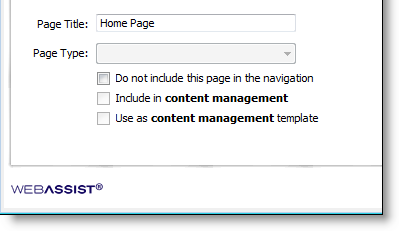
Modifying page details
Site Sculptor provides a variety of default page layouts for you to choose from. This will help you configure a useful layout for that page that can easily be modified from the content management feature.
- Select the page you wish to modify.
- From the Page Type menu, choose a page type that best matches what you want for this page.
Any custom page types that you have created will also be available here.
- Continue doing this for all pages.
The default pages have different page types selected, but you should check to make sure the page types are what you would like for those pages.
- Choose the Do not include this page in the navigation checkbox if you do not want the selected page to be listed in the navigation menu that Site Sculptor creates.
If you do not select this option, all pages that are created in your site will be added within the menu navigation based on the site structure that is presented in the tree.
Content Management settings
If you selected the content management checkbox on the previous interface, you will have two settings available for specifying how this page will be used with your content management.
- If you don't want to include the selected page in the content management feature, uncheck the Include in content management checkbox.
If unchecked, this page will not be available for editing within the content management.
- If you wish to enable the content management template feature on this page, select the Use as content management template option.
Content management templates are also used in PowerCMS 2. This will allow users to create dynamic pages based on the page that you have defined as a template.
Once you have finished configuring your Site Type settings, click Finish.
Save your Site Type preset
After finishing the Site Type interface you will be asked if you wish to save your changes as a new preset. It is recommended that you always save a new preset for your site. This will allow you to recreate this site if you ever need to make any modifications to the pages of your site.
- Select the Save as preset checkbox.
- Enter a name for your preset in the Site Type field.
- Click OK.
Site Sculptor has integrated Theme-it so that you can make the preset designs (and your own custom designs) look exactly the way you want them.
If you are using one of the Site Sculptor preset designs, you will most likely want to make some changes to the design to achieve the color scheme you want. At a minimum, most users will want to replace the default logo with their own website's logo.
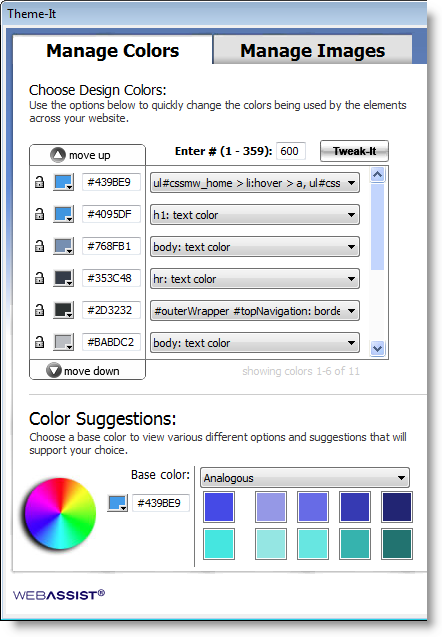
- Once you have selected the design you want to use, click the Theme-It button.
- Choose whether you wish to edit your site design, or home page and content pages separately.
If you want a consistent look across the home page and content pages, you should choose the Site Design option.
- Theme-It organizes the colors used throughout your site for you to make changes easily. Change the color used by any of the color pickers to change all the elements using that color.
- To quickly update your entire site's color scheme, use the Tweak-it option. Enter a number in the text field and click Tweak-it.
Tweak-it will update all of your site's colors instantly by rotating the colors around the color wheel based on the number of degrees you have specified.
- To make changes to the images being used in your design, click the Manage Images tab.
You will want to replace the default logo with the logo of your choice.
- When you have finished making changes in Theme-It, click Finish.
Save your Site Design preset
After modifying your site design with Theme-It you will be asked if you wish to save your changes as a new preset. It is recommended that you always save a new preset for your site. This will allow you to recreate this site if you ever need to make any modifications to the pages of your site.
- Select the Save as preset checkbox.
- Enter a name for your preset in the Site Design field.
- Click OK.
Now that you have configured all the pages that will be created and you have customized the design the way you want it, you can have Site Sculptor create your site for you.
- From the Quick Insert interface, click Finish and Site Sculptor will start creating your site.
Site Sculptor will create all the pages of your site, including the content management files. You will need to be patient as this may take a few minutes.
- Once you have created your site, you will be notified by a 'Your Site is Complete!' message.
After you have uploaded all the files that Site Sculptor has created, you can start using the content management feature to update the content of your site.
- Open your preferred browser (Internet Explorer, Firefox, etc.)
- In the address bar, enter the URL for where you just uploaded your files and press Enter.
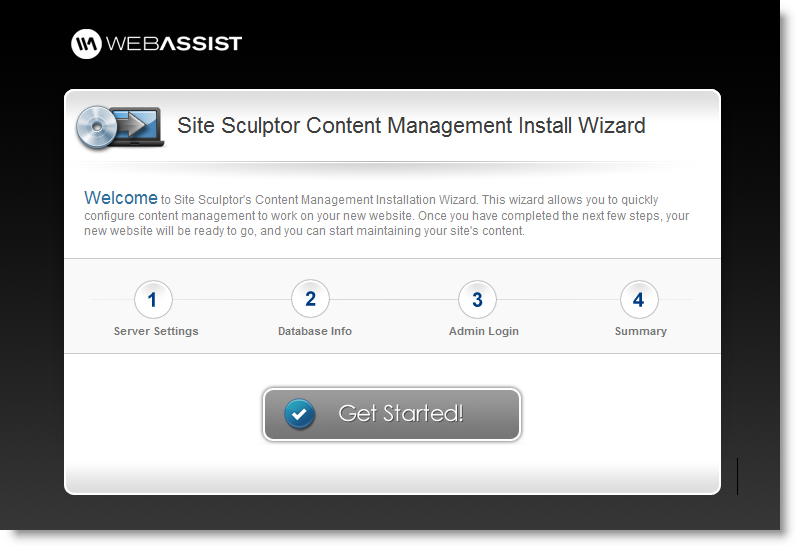
If this is the first time you have visited your site, you will automatically be redirected to install the content management.
- Proceed through the Installation Wizard and refer to the instructions within for guidance on completing each step.
- Once you have completed the Installation Wizard, you will be taken to the content management system for you to start modifying the content that is on the pages of your site.
Returning to the content management feature
You can return to your content management feature at any time after you have installed everything.
- Open your preferred browser (Internet Explorer, Firefox, etc.)
- In the address bar, enter the URL for where you just uploaded your files and append /admin.
For example, mysite.com/admin.
- Enter the User name and password that you specified when installing the content management feature and choose Login.
With your site created and your content management set up, all you need to do now is update all the content for your site. Once you have updated the content for all pages, you can start announcing your site to the world.