Order History pages can be very useful, they allow your customers to keep track of what they have purchased, and can be further enhanced to function as a Download Center if you are selling digital goods.
This How To guides you through creating an Order History page, and a customer’s Order Detail page to display their orders.
In order to successfully accomplish the steps describe in this document, you should first follow the steps in the following tutorial in order to implement register and login functionality for customers.
Applying Login/Registration to your checkout page
- Dreamweaver CS3 or higher
- Dreamweaver site with eCart checkout functionality with registration already created.
- Data Bridge
- WebAssist Free eCommerce MySQL database (Optional)
ecommerce-database.html
This tutorial refers to the Free eCommerce MySQL database that is provided by WebAssist. This database contains all the necessary tables and columns to complete this tutorial. If you are not using this database, you will need to review the table and column references to make sure they match up with your database structure.
The first step is to ensure that the Customer ID for the customer who is making the purchase is going to be recorded in the database along with the details for the order.
You will need to have configured eCart to store the cart summary in your database. You can confirm this by checking to see if an eCart Store Summary in Database server behavior exists in the Server Behaviors panel of the confirm page.
Step 1: Creating the OrderUserID column in your database
First, you need to create the database column in your orders table for storing the customer/user ID.
If you are using the Free eCommerce Database from WebAssist, this column will already exist and you are probably already storing this information in your database, so you can skip this step.
- Using your preferred database manipulation tool, open the orders table, or the table that you are using to store your order summary.
- Insert a new column to your database, name this column OrderUserID.
- Specify this column as the Integer Datatype.
Step 2: Update the server behavior
- In Dreamweaver, open your eCart confirm page.
- From the Server Behaviors panel, double-click on the eCart Store Summary in Database server behavior.
- Select the OrderUserID column.
- Click the Value lightning bolt.
- Expand the Session option.
- Select the UserID option.
- Depending on the Session Variable used with SecurityAssist, this may be named differently.
- Click OK.
- Click OK again.
You've now configured eCart to store the customer ID in the database when it records each order. You will now use this information to create the Order History page
In this next step, you will learn how to create the Order History page using DataAssist. These steps utilize the DataAssist wizard to create the necessary pages.
Step 1: Creating the Order History page
- Open the DataAssist wizard by choosing Insert > WebAssist > DataAssist > DataAssist Wizard.
- Choose your database connection.
- Choose your orders table, or the database used to store order information
- If desired, choose a template to use.
- Choose to only create a Results page
- For this example, you do not need to create any of the other pages and should uncheck those options.
- Name the results page customer_order_history.php.
Throughout this tutorial, we will use this filename for the results page. Feel free to choose a different filename.
- Click Next to proceed through the wizard.
- Proceed through the wizard as you would normally, removing any unnecessary database columns from being included on your page, and renaming any others.
- The following few adjustments should be made to the Results page options as you proceed through the wizard.
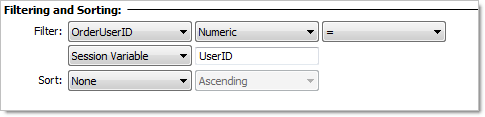
- From the Filter menu, choose OrderUserID.
- This is the database column that stores the UserID for the order. Your database column may be named differently.
- Leave Numeric and (=) selected in the other two menus.
- Choose the Session Variable option from the menu below.
- Enter UserID in the text field.
In this example, UserID is the name of the Session Variable used by SecurityAssist.
- Proceed through the rest of the wizard and click Finish to create the two pages.
Step 2: Creating the Order History Details page
Next, we will run through the DataAssist wizard again to create the page which will display the details for each order. Even though we will be displaying details, we will be creating a DataAssist Results page only.
- Open the DataAssist wizard by choosing Insert > WebAssist > DataAssist > DataAssist Wizard.
- Choose your database connection.
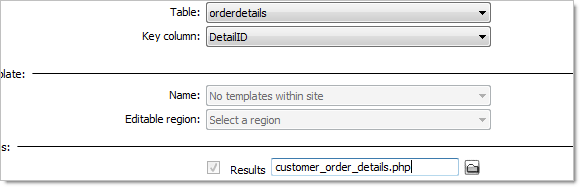
- Choose the orderdetails table, or the table you use to store your order details.
- Leave DetailID for the Key column.
- This time, only choose to create a Results page.
Make sure to uncheck all other pages.
- Name the results page customer_order_details.php.
- Click Next to proceed through the wizard.
- Proceed through the wizard as you would normally, removing any unnecessary database columns from being included on your page, and renaming any others.
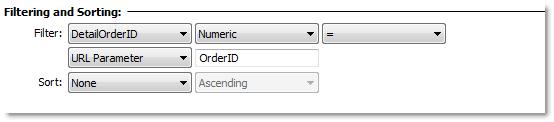
- On the Results page options step, choose DetailOrderID from the Filter menu.
- Leave Numeric/=/URL parameter specified in the other three fields.
- Enter OrderID in the text field as shown in the figure below.
- Click Finish to create the page.
In order to protect the DataAssist pages you just created, we need to apply SecurityAssist.
Before proceeding, make sure to close the pages DataAssist has created in Dreamweaver.
- From the WebAssist menu, choose SecurityAssist > Manage Site Access > Access Pages Manager.
- Ctrl (Cmd) Click to select both the customer_order_detail.php and customer_order_history.php pages.
- From the Grant access if menu, choose Logged in to users.
- Choose the browse icon for If access denied, go to.
- Select your Login page.
- Click OK.
- Click OK again to close the Access Pages Manager.
Next, we need to modify the Order History page to go to our Order Detail page.
- Open the customer_order_history.php page.
- In Design View, highlight the recordset binding that you would want to be linked to the details for the order.
Typically, this would be the OrderID which displays as {WADAorders.OrderID}.
- In the Properties Inspector, choose the File Browse option.
- Select the customer_order_details.php page.
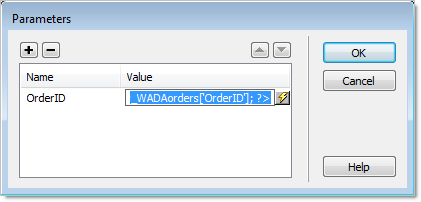
- Click the Parameters button.
- In the Name column, enter OrderID.
- Choose the Value column lightning bolt.
- Expand the WADAorders Recordset and choose OrderID.
- Click OK.
- Click OK again to create the link.
- Press Ctrl (Cmd) S to save the page.
We will now customize the recordset used by the customer order detail page to connect both the orders and the order details tables. This will allow us to display the correct details for each specific order.
- Open the customer_order_details.php page.
- From the Server Behaviors panel, double-click on the DataAssist Recordset.
This is most likely named 'WADAorderdetails'.
- Select the Advanced button.
In the Recordset window, we will make a number of modifications. The following section is broken down into multiple steps for greater clarity.
For each mention of a database table or column, you may need to adjust the new code to match your database's configuration.
The SELECT statement
The SELECT statement should currently appear as follows:
SELECT DetailID, DetailOrderID, DetailProductID, DetailName, DetailPrice, DetailSKU, DetailQuantity
Depending on the options you selected in DataAssist, you may have different database columns listed.
- Change this entire statement to read as follows:
SELECT orders.*, orderdetails.*
This modifies the SELECT statement to display all contents from both the orders table (orders.*) and the orderdetails table (orderdetails.*)
The FROM statement
The FROM statement should currently appear as follows:
- Change the entire statement to read as follows:
FROM orders INNER JOIN orderdetails ON orders.OrderID = orderdetails.DetailOrderID
The INNER JOIN statements are required to connect two different database tables. The statement says that the OrderID column of the orders table relates to the DetailOrderID column of the orderdetails table.
For a greater understanding of how INNER JOIN statements work, review the following tutorial http://w3schools.com/sql/sql_join_inner.asp.
The WHERE statement
The existing WHERE clause was created when running the DataAssist Wizard. We need to add an extra filter to this statement.
Your current WHERE clause should appear like:
WHERE DetailOrderID = WADAOrderID
- Change the entire statement to read as follows:
WHERE orderdetails.DetailOrderID = WADAOrderID AND orders.OrderUserID = paramUserID
The WHERE clause allows you to specify any grouping or filtering options for the query. In this case, we are filtering by the OrderID and a parameter for UserID. Before this will work, we need to create that parameter, which we will do next.
Once you have modified the entire SQL statement, it should appear like this:
Step 1: Add another Variable (Parameter)
The final step in modifying the SQL statement is to add the Variable to be used by this recordset to work with our new SQL statement.
- Click Add ( + ) to create a new variable.
- In the name field enter paramUserID.
- In the Default value field, enter -1.
- In the Runtime value field, enter $_SESSION['UserID'].
- Click OK.
You've now completed modifying this Recordset.
- Click OK again to update your Recordset.
- Press Ctrl (Cmd) S to save your page.
Now that you have updated your recordset, you will be able to display details on the Customer Order Details page from both the orders table and the orderdetails table.
Currently, this page is only displaying content from the orderdetails table. However, you will probably want it to also display information regarding the Order that these details are associated with.
Step 1: Adding additional order details
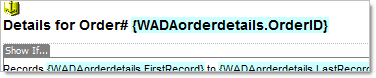
- Highlight the Page Title at the top of the customer_order_details.php page.
- Replace 'Page Title' with Details for Order#.
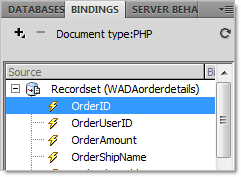
- From the Bindings panel, expand the WADAorderdetails Recordset.
- Click and drag the OrderID binding to your page at the end of the new page title.
This way, on the customer_order_details page, the title will display which order these details are for.
Step 2: Additional modifications
You may also want to remove certain details from displaying on the results page. For example, in most cases, displaying the SKU will not be necessary for most pages. To do this, simply highlight what you want to remove, and click delete.
You've now completed the creation of an Order History page for your customers.
For testing your Order History page, you will need to have orders in the database. Perform some test transactions on your site if necessary.
With your Order History completed, there are a number of other features that you might want to add to your online store. For example, if you are selling digital goods, you might want to create a Download Center to allow customers to download their purchases.