close ad
 
Important WebAssist Announcement
open ad
View Menu

Technical Support Forums

Free, outstanding support from WebAssist and your colleagues

rating

eCart Sage Pay VSP

Thread began 11/24/2011 3:06 am by michael271305 | Last modified 11/29/2011 7:04 am by Jason Byrnes | 2172 views | 3 replies |

michael271305

eCart Sage Pay VSP

Hi

Putting this here as no response to support ticket.

Trying to configure eCart for SagePay but have the following issues:

1) Forms

I am using the forms option but at present when I run the checkout through SagePay's simulator is comes back with errors because delivery address information is not included. How do I get around this as my client contacts customers to arrange delivery?

2) Server

I am also trying to configure for server for comparison as the forums indicate this is the preferred option :)

I have added the three additional fields to the Orders table as per the post titled 'SAGEPAY and ECART5' in the forums.

I then ran the checkout Wizard opting for SagePay with server. At the store order summary in database dialog I left the preset at Default - Sage Pay and connection as the one defined before starting to implement eCart.

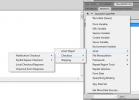
On selecting next I was told I needed to bind the three Sage Pay Authentication values correctly.
Sage Pay VSP Server Authentication -> Vendor Transaction Code
Sage Pay VSP Server Authentication -> Security Key
Sage Pay VSP Server Authentication -> Sage Pay Transaction ID

I tried looking under the '+' in the bindings panel but could not see the entries.

Firstly, should I have left the preset as Default - SagePay or should I have just used Default?

How do I bind the fields in my database to the authentication values?

I am not a proficient PHP coder and any help for both issues would be appreciated.

Thanks

Sign in to reply to this post

Jason ByrnesWebAssist

1) In the checkout wizard, on the shipping section, leave the "I will provide shipping" options checked. you can leave the provider set to none, and leave the base rate and incremental rate set to 0.

2) you should be using the Default - Sage Pay preset.

On the bindings panel, there should be a binding collection titled "Sage Pay VSP Server Authentication"

under that binding group, you should see the bindings for the
Vendor Transaction Code
Security Key
Sage Pay Transaction ID

Sign in to reply to this post

michael271305

Hi Jason

I have followed your steps but if I run the checkout wizard I get to the point where it asks me to do the bindings. I can see it is trying to add SagePay related elements to the bindings panel but I cannot select them while the checkout wizard is active. If I cancel this the bindings are removed.

I tried to find the three bindings as you indicated, prior to starting the checkout wizard, but I cannot find them in the bindings panel. I have attached a screen grab showing the bindings panel as it appears when I open it.

Sign in to reply to this post

Jason ByrnesWebAssist

I have created a support ticket so we can look into this issue further.

To view and edit your support ticket, please log into your support history:
supporthistory.php

If anyone else is experiencing this same issue, please append to this thread.

Sign in to reply to this post

Build websites with a little help from your friends

Your friends over here at WebAssist! These Dreamweaver extensions will assist you in building unlimited, custom websites.

Build websites from already-built web applications

These out-of-the-box solutions provide you proven, tested applications that can be up and running now.  Build a store, a gallery, or a web-based email solution.

Want your website pre-built and hosted?

Close Windowclose

Rate your experience or provide feedback on this page

Account or customer service questions?
Please user our contact form.

Need technical support?
Please visit support to ask a question

Content

rating

Layout

rating

Ease of use

rating

security code refresh image

We do not respond to comments submitted from this page directly, but we do read and analyze any feedback and will use it to help make your experience better in the future.

Close Windowclose

We were unable to retrieve the attached file

Close Windowclose

Attach and remove files

add attachmentAdd attachment
Close Windowclose

Enter the URL you would like to link to in your post

Close Windowclose

This is how you use right click RTF editing

Enable right click RTF editing option allows you to add html markup into your tutorial such as images, bulleted lists, files and more...

-- click to close --

Uploading file...